Seiten

Donnerstag, 29. Februar 2024

Assistance with Tactical Tips for Game and Scenario Control

In recent times, I've received numerous messages from players seeking help, particularly when it comes to playing against Dweghom. Fondly referred to as Dreckhom in Bremen and Lübeck. A common issue that arises is the tendency of many players to focus solely on beating up the opponent, which is never the most promising approach, especially when scenarios and points are not taken into consideration. In this article, I want to provide you with 5 practical tips.

Why the scenarios are crucial

Conquest: Last Argument of Kings is not just a simple clash between armies but a tactical game based on scenarios. Each scenario presents different objectives and challenges to overcome. By focusing solely on combat, we often neglect the actual goals of the game and risk losing valuable points. Even in scenarios where we can earn points for destroying enemy regiments, there are usually two to four zones where we can score, which often are mathematically more valuable than a dead regiment on the opponent's side. Whoever understands and masters the scenario wins the game, even if their army is later wiped out. Seriously, if your goal is just to beat up your opponent, then play Dweghom or Old Dominion; they have to do that but also address the scenario later on. Without focusing on the scenario, you simply lose the game here.

I. Strategic Planning for Success

Overall, the importance of balanced strategic planning is undeniably crucial and can be summarized as "know the damn scenario" well. Especially in encounters with challenging factions like Dweghom and Old Dominion, it's crucial to maintain control over the scenarios and gain strategic advantages. Planning, in this case, refers to the army list, and I've written something about writing army lists before, from which I'll pick up or nudge individual points again.

With the current scenarios, we always have 2 to 6 zones where we want to score points. This means that we should also pack a corresponding number of selections that can do so. For most armies, these are medium and heavy regiments, and a few have access to spells or abilities that allow even light regiments to score points.Furthermore, we should ensure that these regiments are available at the right moment. I often see fast armies like Nords, Wadrhun, etc., simply packing heavy regiments without options to hold a zone. For this purpose, one usually wants to deploy cheap regiments that just stand there. Therefore, a good mix of medium and heavy regiments is usually a good idea, especially since heavy regiments sometimes participate very late in the game. I've also written something about this in the article "Army Lists in Conquest Last Argument of Kings."

Every faction in the game has a way to get to zones on the centerline in round 2 if their center is not more than 12" away from the edge of the board. For this, you need a few things, such as a regiment with Movement 6 and Vanguard to move the Reinforcement Line forward to about ~13", or other plans. Then, a regiment that is two stands wide (important, because otherwise the pivot is too expensive), with Movement 7 and a standard or Movement 5 and Vanguard, can run into this zone with one stand. Simply nice and convenient from the side, and presto, we have a few points. And yes, this is not optimal for fighting, and we have to spend an action later to make a reform action, but we get points for it.

Here's a diagram for it:


But please don't think that this alone will win you the game, and don't do it if, for example, 5 Berserkers are already drooling in front of the zone. Try to do it with your last activation, and if it's too risky, abandon the plan. It may also be that your opponent knows what you're doing.

Furthermore, there are situations where scoring points is too expensive for you or what you have to invest for it. Always remember that ten rounds are played, and most scenarios can be won if you score alone from round 7 onwards.

II. Exploiting Mobility and Exerting Control

Know the movement ranges of the opposing regiments. Fast regiments could exploit the limited flexibility of other regiments against them. By placing your units outside of their range, preferably at the edge of the zones, the opponent must move. The more zones we have, the better, because slow regiments will then have to divide, generating unfair fights. By "unfair," we mean breaking into the flank with one regiment and into the front with another. Usually, double the points can kill an enemy quite reliably. Especially against Dweghom, it's very easy to stand just outside their range, as none of their regiments can advance beyond 14" from the rear edge of the battlefield and therefore cannot directly score most zones.

If we want to keep our distance, we hold a zone approximately like this:

If we don't want the opponent to be able to enter the zone, we hold the zone like this:

Why do we do this? Because the opponent, after a Charge Clash, usually ends up right in front of the zone and typically doesn't have a third action to move into it. If there's ideally a counter unit behind, even better.

This way, we can usually force the opponent to march towards us with an early focus on zones and thus points. If there are four or more zones, they'll have to divide further. If they don't do that, we simply win because they can't catch up with the point deficit.

Tactical Suicide

It may be necessary to sacrifice some resources to keep the opponent in check. This may mean concentrating units on one side to confront the opponent there with overwhelming force. Alternatively, it may involve deliberately placing weaker regiments in the path of the opponent to restrict their movement options. The latter is very common and highly effective for maintaining your lead or redirecting the opponent.

For this approach, size-1 regiments that are as cheap as possible are much more suitable than size-2 regiments because they can be concealed. Otherwise, there is a risk that the opponent will shoot over their models and your sacrificial unit will die without fulfilling its purpose. Ideally, place the sacrificial regiment just 1" in front of the opponent, so they cannot place another regiment between them and must use the entire action of the blocked regiment to kill your troops with Move Charge, without making any real progress in the scenario.

III. Dealing with Death Zones


In some lists, magic and ranged attacks dominate, and there are strategies aimed at making your life difficult with overlapping fire corridors. The Dweghom, in particular, excel at this, and it's important to know the realistic ranges your opponent can control and how much damage they can inflict.

Let's consider the example of the Dweghom again, who have ranged attacks at 14, 16, and 18 inches, with the dangerous ones featuring Armor Piercing 2 at 14 and 16 inches and only Volley 2. This means we are safe as long as we stand outside of this range plus the opponent's movement. This is usually only possible in the early rounds of the game, as we then want to engage in the scenario, but it's also crucial there. I can't count how many times people have placed their regiments within Aim Shoot range of my crossbows and wondered why stands were being removed.

Eventually, we naturally have to move into the zones and get close to the opponent. It's important that regiments wanting to move forward are activated late and already plan for the next round. This means either using our own regiments to block sightlines to narrow down fire corridors or choosing our position so that the opponent has to move and doesn't get a target bonus. Especially with six or more shooting regiments, this is not so easy, but under no circumstances should you send individual regiments in early unless they can make a good trade safely. The keyword here is target overload. In deck building, characters are then placed high, and we essentially only send our army into the throat of hell, uh, the death zone after three or four activations. It's helpful if you can tempt the opponent to move to be able to attack them meaningfully in the next round. But the main purpose of this simple trick is to prevent the opponent from focusing their fire on individual regiments and taking them out completely.

IV. Close Combat and Target Selection

Unfortunately, there comes a point where we have to face the opponent, preferably on our own terms and with the right tools. It's important to keep in mind what's happening on the battlefield and how to defeat each unit. In the current "meta," the answer is usually "Value of Attacks," but there are, of course, regiments where higher Cleave values make sense. Evil as it may sound, mathematics can help us determine what is effective and what is not. Simply estimate in your mind how many wounds you cause, remembering that "Cleave" corresponds to 50%. For example, if you have 12 attacks on a 3+ and your opponent has D3 R3, then on average, that results in 4 lost hit points. If the opponent has just one more armor, it's only two hit points lost. I always calculate conservatively, subtracting one for every five hits, and that almost always works.

Free yourself from the notion that my big block / monster has to kill the important enemy figure. Seriously, I cannot stress enough how often I've seen an Apex charge into five Dragonslayers and wonder why hardly any damage was dealt and the Apex had to retreat. For those who don't know, an Apex has Cleave 2 and Terrifying 2, while Dragonslayers have Hardened 2 and with the Apprentice, they are fearless. So, the Apex has 11 attacks on 4+, and the Dragonslayers stoically endure it with D3 R4 W6 and then strike back. Look at the stats and abilities of the Dragonslayers in the Army Builder and feel free to write down below the likelihood of the Apex winning this fight. I'll take a guess and say 2%.

In my opinion, it's almost always better to take a card from the opponent by killing an inferior regiment with the great units. Sure, it's not a fair fight, but you tend to lose fair fights, so you should try to slowly tilt the balance in your favor. If you position the regiment outside the sensible threat range of the opponent and keep dancing around, even better. Preferred targets here are medium regiments that just want to score alone or light regiments with characters. Card advantage is a relevant point in a game with alternating activations.

V. Self-reflection and Attitudes

Currently, I play about 15 games per month, and whether in defeat or, especially, in victory, I take the time to reflect on the game and my decisions. In doing so, I consciously ignore factors such as luck with dice or the perceived superiority or inferiority of my army. These are often the first reasons that come to a tabletop player's mind to hide from their own mistakes.

Instead, I ask myself: Which of my tactical decisions were not optimal, and how could I have made them better? Even I rarely make flawless moves, and sometimes the desire to do something cool simply outweighs wisdom. That's rarely smart, and in most cases, my mistakes involve misjudgments in attacks, deck building or placement errors, or the movement of my units. Especially for less experienced players, recognizing tactical errors or identifying alternative moves can be challenging. However, this ability develops over time and through a lot of playing. Like most things in life, practice makes perfect. When in doubt, discussing moves openly with your opponent can help. Just ask them what they find most troubling and why. In my practice games with Nino, this is common practice, and there are always options that I hadn't seen or considered.

Another important point is the influence of thoughts and attitudes on the gameplay. If a player is already convinced that they will lose before the game even starts, it has no positive effects. On the contrary, it leads to less effort being put into their strategy and not fully utilizing the potential of their own army. Additionally, players often overlook tactical mistakes by their opponents because they see them as part of a supposed master plan. I observe this particularly often in players who play against certain list variants, factions, or good players and have already mentally given up instead of focusing on their weaknesses and developing a plan. Again, communication is key. When in doubt, consider the whole experience as practice to have a better response next time.

Mittwoch, 28. Februar 2024

Tournament Report from Lübeck Game 3: Hundred Kingdoms vs. Spire

Overview
Game 1
Game 2
Game 3

First, here's my list again for reference, along with the scenario:


Unkreativ [2000/2000]

The Hundred Kingdoms
Relentless Drill

== (Warlord) Priory Commander (Crimson Tower) [110]:
 * Order of the Ashen Dawn (3) [240]:
 * Order of the Ashen Dawn (3) [240]:
 * Order of the Crimson Tower (3) [215]: Standard Bearer

 * Order of the Crimson Tower (3) [200]:

== (Warlord) Imperial Officer [90]: Brace for Impact, On Your Feet
 * Mercenary Crossbowmen (3) [105]:
 * Mercenary Crossbowmen (3) [105]:
 * Men at Arms (3) [110]: Standard Bearer 


== Noble Lord [90]: Weapon Master, Graceful Combatant
 * Mercenary Crossbowmen (3) [105]:
 * Household Knights (3) [140]: Standard Bearer
 * Household Knights (3) [140]: Standard Bearer
 * Mercenary Crossbowmen (3) [110]: Standard Bearer

And now, little Nicki's list

Like nothing ever changed [2000/2000] The Spires The Directorate == High Clone Executor [130]: Infiltrator Variant * Force-Grown Drones (3) [90]: * Vanguard Clone Infiltrators (3) [170]: == (Warlord) Biomancer [140]: Master of Flesh * Force-Grown Drones (3) [90]: == Lineage Highborne [140]: Attracting Pheromones * Avatara (3) [165]: * Avatara (3) [165]: * Incarnate Sentinels (3) [210]: * Siegebreaker Behemoth (1) [190]: == Pheromancer [100]: Avatar Projection * Stryx (3) [120]: * Stryx (3) [120]: * Brute Drones (3) [170]: The list may seem peculiar, but it boasts quite a few tools and tricks, especially when it comes to the Biomancer. His ability to count a regiment as scoring per turn is useful, but it gets complicated when he can also apply that to the Stryx. Being a Warlord, the regiment can be on the other side of the battlefield, and of course, he can perform a triple activation every round. Add to that a hail of bullets from VCI with Deadly Shots, which is always taxing. Last time in the forest, they shot down two Ashen Dawn, which was annoying, but such things leave an impression. Another trauma in the game was the Siegebreaker, who with UE and Burnout immediately comes to Movement 10 Clash 5 and jumps right into your face. All in all, quite challenging.

We start in round one, and I get two Crossbows while he gets everything except one unit of FGD. So, he has six cards available. After I've positioned myself, he places one unit of Stryx on each flank and the rest in the center.

In round 2, I receive Knights, Man at Arms, and the remaining Crossbows. Nick gets the Brutes, FGD, and Avatara once. A disadvantage of four cards. I decide to advance on the right flank and place my horses there to possibly deter the Stryx from an attack. However, I change my plan and place the Man at Arms on the left flank since Stryx are expected to appear there and not be wiped out by the Noble Lords and Crossbows. It was a mistake to leave them alone on the flank, knowing that the objective would heavily impede me. Why they were still there, I couldn't recall. Damn pre-5-minutes-past-Hanna.
His Avatara advance on the right flank, and his Brutes on the left. When I'm done, the Biomancer strengthens the Spire with buffs, giving the Infiltrator with UE the opportunity to eliminate my Crossbows and then move into a zone to score. The minor damage from Decay is immediately healed. 0:3.

In round 3, Nick gets the rest, as the Spire can flank for Brutes, and for me, I get Ashen Dawn, Crimson Tower, and Household Knights. Nick continues to let me run into emptiness, while on the right flank, I engage the first Stryx with Move Charge. I inflict two damage on them and suffer four from Lethal Demise. Not as planned, but I manage to eliminate the other Stryx with the Crossbows. Then there's a lull, and I need to bring the remaining Knights onto the battlefield. Crimson and Household Knights on the right, and Ashen Dawn on the left flank. Then it's Nick's turn with the rest, advancing with the Incarnates on the right flank, putting the Siegebreaker against the Ashen Dawn, and the VCI almost shooting down one Ashen Dawn in the forest before retreating 9 inches and healing the damage from Burnout. It doesn't feel fair.

In round 4, I need to start acting decisively. A new plan is needed as I haven't been consistent in finishing off the others. I decide to apply pressure on the right flank, as it lacks the firepower I've consistently placed on the left flank. So, the other Crimson Tower and Ashen Dawn march forward on the left flank. No questions asked. Even Nick looked in puzzled, searching for the master plan behind it. Probably because of the Siegebreaker to whom I still owed bloody revenge from the last game.

In short: My previous plan is scrapped, and I attempt to lure him in, but he politely declines. His Incarnates obliterate the Household Knights, and my other Household Knights struggle against the Avatara, causing minimal damage but losing a rider. Then Nick takes down an Ashen Dawn with the VCI, and my Crossbows dispatch two Avatara, making room to bring the Crimson to the FGD. Nick looks surprised at the zone now under my control. He briefly considers holding the zone with his FGD and the Biomancer but deems the latter too valuable to risk losing. Therefore, he safely retreats his Biomancer behind the Brute Drones using double March.
In round 5, I use my Supremacy and must start becauser things aren't going well. Sir Nick reconsiders his deck construction for what feels like 20 minutes, trying to decipher my twisted thoughts and plans. If he only knew that I currently had no plan myself... well, just to be safe, he goes to the bathroom again and returns pale and bloodless, only to roll a one for the starting roll. Bathroom break... right. Ritual sacrifices to summon an abomination with which he has probably made a dark pact would be more accurate.

What follows is the triple activation, starting with the VCI with UE, which shoots down two Crimson Towers, followed by the second Avatara with Burnout, pinning down my guys. I survive with 4 health and consider the right flank lost. There's no meaningful option left to fight the VCI, so I attack the Brute Drones, causing enough damage that even after healing, one is still dead. Then the Man at Arms march in front of the Ashen Dawn, hoping to lure Siggi, who politely declines. In the right zone, the Household Knights and the Avatara fall, and a unit of Crossbows attacks the VCI.


At the start of round 6, my options are running thin, and it's clear that my Crimson must continue pounding on the Brutes before the Man at Arms can lend a hand. Nick activates the VCI and Avatara through the Biomancer, eliminating a portion of my troops. By the end of the round, the Brutes have even suffered two more damage than they healed. At least Siggi finally dares to enter the fray and effortlessly dispatches the Man at Arms. This opens up the opportunity for me to attack with three Ashen Dawn, but I only manage to inflict 8 damage, which isn't enough to defeat him. More importantly, Nick breaks my Crimson Tower, gaining more stands in the zone, while his Stryx are on the verge of reaching my far-right zone. Because the Biomancer can score with Stryx on the other side of the battlefield if they're in a zone. Well, things look bleak, but if I start next round and maybe kill the Siegebreaker... then perhaps I could still turn this around.

In round 7, Nick starts and once again ignites a triple activation, resulting in the death of both Crimson and Ashen Dawn. My last two Ashen Dawn make a desperate charge attempt to kill Siggi but fail. At that point, I concede. Those constant triple activations at the beginning were just too much for the valiant humans, and the game ends 2:64.

Conclusion: Lübeck was filled with joy as Nick emerged victorious, and I pondered how to improve the matchup. An important factor is that this defeat gives me ammunition to complain about the Spire in Redbeard's presence for about three-quarters of a year. But most importantly, Nick obviously rolled much better than I did and therefore emerged victorious. That's how it always goes in tabletop, and the damned triple activation of the Spire, which they've had for years and is damn nasty, is of course also to blame. My tactical genius was undoubtedly flawless, and the fact that I consistently failed to finish a plan and spread myself too thin had nothing to do with the defeat. Playing to my strengths by consistently focusing on one flank and sacrificing both units of Household Knights bluntly into the VCI to control it would have been an option. But why would one do that?

Upon evaluation, it turned out that I had the best Strength of Schedule (SoS) with a score of 7, earning me a spot on the podium. Nick claimed the first place with the imba Spire, and second place went to the anointed Hazlias Nino, who led an army of Bone Golems shaped in his likeness onto the field.

Postscript: Nick insisted that I include the photo of him with the trophy. Proud as a peacock, little Nicki:

Hilfestellung mit taktischen Tipps für Spiel- und Szenarienkontrolle

In letzter Zeit habe ich zahlreiche Nachrichten von Spielern erhalten, die nach Hilfe suchen, insbesondere wenn es darum geht gegen Dweghom zu spielen. In Bremen und Lübeck auch freundlich Dreckhom genannt. Ein häufiges Problem, das dabei zum Vorschein kommt, ist die Tendenz vieler Spieler, sich ausschließlich auf das bloße Verprügeln des Gegners zu konzentrieren, was nie die erfolgsversprechendste Herangehensweise ist. Gerade wenn die Szenarien und die Punkte dann keine Berücksichtigung finden. In diesem Artikel möchte ich euch 5 praktische Tipps an die Hand geben,

Warum die Szenarien entscheidend sind

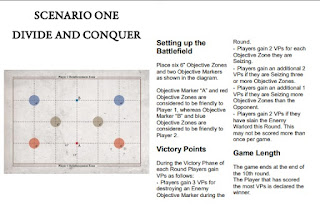
Conquest: Last Argument of Kings ist nicht nur ein einfacher Schlagabtausch zwischen Armeen, sondern ein taktisches Spiel, das auf Szenarien basiert. Jedes Szenario stellt unterschiedliche Ziele und Herausforderungen dar, die es zu meistern gilt. Indem wir uns ausschließlich auf den Kampf konzentrieren, vernachlässigen wir oft die eigentlichen Ziele des Spiels und riskieren, wertvolle Punkte zu verlieren. Selbst in den Szenarien, in denen wir Punkte für das Auslöschen von gegnerischen Regimentern bekommen können, gibt es meist zwei bis vier Zonen, in denen wir punkten können und die oft rechnerisch einfach mehr Wert sind als ein totes Regiment beim Gegner. Wer das Szenario verstanden hat und beherrscht, gewinnt das Spiel, auch wenn seine Armee später ausgelöscht wurde. Ernsthaft, wenn euer Ziel ist euren Gegner nur zu verprügeln, dann spielt Dweghom oder Old Dominion, die müssen das tun, aber gehen später auch auf das Szenario ein. Ohne Szenario verliert man hier schlichtweg das Spiel.

I. Strategische Planung für den Erfolg

Insgesamt ist die Bedeutung einer ausgewogenen strategischen Planung unbestreitbar wichtig und lässt sich mit "kenne das verdammte Szenario" gut zusammenfassen. Insbesondere in Begegnungen mit den herausfordernden Fraktionen wie Dweghom und Old Dominion ist es entscheidend, die Kontrolle über die Szenarien zu behalten und strategische Vorteile zu erlangen. Die Planung ist in diesem Fall die Armeeliste und ich habe schon Mal etwas zum Schreiben von Armeelisten geschrieben, wovon ich einzelne Punkte wieder aufgreifen oder anstupsen werde.

Mit den aktuellen Szenarien haben wir stets 2 bis 6 Zonen, in denen wir punkten möchten. Das bedeutet, dass wir auch entsprechend viele Auswahlen einpacken sollten, die das können. Für die meisten Armeen sind das mittlere und schwere Regimenter und einige wenige haben Zugriffe auf Zaubersprüche oder Fähigkeiten die auch leichte Regimenter punkten lassen.
Außerdem sollten wir sicherstellen, dass diese Regimenter auch im rechten Augenblick verfügbar sind. Ich sehe oft, dass schnelle Armeen wie Nords, Wadrhun usw. einfach nur schwere Regimenter einpacken, ohne Optionen eine Zone zu halten. Dafür möchte man meist günstige Regimenter abstellen, die einfach nur dort rumstehen. Deswegen bietet sich meist eine eine gute Mischung aus mittleren und schweren Regimentern, gerade da schwere Regimenter teilweise sehr spät am Spielgeschehen teilnehmen. Dazu hatte ich auch Mal etwas im Artikel "Armeelisten bei Conquest Last Argument of Kings" geschrieben. 

Jede Fraktion im Spiel hat eine Möglichkeit in Runde 2 auf Zonen auf der Mittellinie zu kommen, wenn deren Zentrum nicht mehr als 12" vom Spielfeldrand entfernt ist. Dafür braucht man ein paar Dinge wie z.B. ein Regiment, welches mit Movement 6 und Vanguard die Reinforcement Linie nach vorne auf ~13" zieht oder andere Pläne. Dann kann ein Regiment, welches zwei Stands breit ist (wichtig, weil sonst der Schwenk zu teuer wird), mit Movement 7 und Standarte oder Movement 5 und Vanguard mit einem Stand in diese Zone laufen. Einfach schön und bequem von der Seite rein und schwupps haben wir ein paar Punkte. Und ja, das ist zum Kämpfen nicht optimal und wir müssen eine Aktion später aufbringen, um eine Reformaktion zu machen, aber wir kriegen dadurch Punkte.

Hier Mal ein Schaubild dafür: 


Denkt jetzt aber bitte nicht, dass dies euch alleine das Spiel gewinnt und macht da auch nicht, wenn z.B. 5 Berserker vor der Zone stehen und ihnen schon die Sabber aus dem Mund läuft. Versucht das mit eurer letzten Aktivierung zu machen und sollte das zu gefährlich sein, verwerft den Plan. Es kann ja auch sein, dass euer Gegner weiß, was ihr da macht.

Außerdem gibt es auch Situationen wo Punkten für euch zu teuer ist bzw das was ihr dafür investieren müßt. Denkt immer daran, dass zehn Runden gespielt werden und die meisten Szenarien gewonnen werden können, wenn ihr ab Runde 7 alleine durchpunktet. 

II. Beweglichkeit ausnutzen und Kontrolle ausüben

Kennt die Bewegungsreichweiten der gegnerischen Regimenter. Schnelle Regimenter könnten die geringe Flexibilität der anderen Regimenter gegen sie verwenden. Indem du deine Einheiten außerhalb der Reichweite, bevorzugt am Rand der Zonen, platzierst, muss der Gegner sich bewegen. Umso mehr Zonen wir haben, umso besser, weil gerade langsame Regimenter sich dann aufteilen müssen und man so unfaire Kämpfe generiert. Mit "unfair" ist in diesem Fall gemeint, dass wir mit einem Regiment in die Flanke brechen und mit einem in die Front. Normalerweise töten die doppelten Punktanzahl einen Feind recht sicher. Gerade gegen Dweghom ist es sehr einfach, gerade außerhalb ihrer Reichweite zu stehen, da diese mit keinem Regiment von der hinteren Spielfeldkante weiter kommen kann als 14" und somit die meisten Zonen nicht direkt punkten können.

Wenn wir auf Abstand bleiben wollen halten wir eine Zone ungefähr so:

Wenn wir nicht wollen, dass der Gegner nicht in die Zone kommen kann, halten wir die Zone so:

Warum machen wir das? Weil der Gegner mit einem Charge Clash genau vor der Zone steht und im Normalfall keine dritte Aktion hat um sich dort rein zu bewegen. Wenn dann optimalerweise noch eine Kontereinheit dahinter steht, ist es umso besser.

So können wir meistens mit einem frühen Fokus auf Zonen und somit Punkte den Gegner zwingen zu uns zu marschieren. Wenn es vier oder mehr Zonen sind, muss er sich darüber hinaus sogar aufteilen. Tut er das nicht, gewinnen wir einfach, weil er den Punkterückstand nicht mehr aufhalten kann.

Taktischer Suizid

Es kann erforderlich sein, einige Ressourcen zu opfern, um den Gegner in Schach zu halten. Das bedeutet möglicherweise, dass man Einheiten auf eine Seite konzentriert um den Gegner dort mit einer Übermacht zu konftrontieren. Alternativ kann es auch sein, dass man den Gegner bewußt schwächtere Regimenter in den Weg stellt um seine Bewegungsmöglichkeiten einzuschränken. Letzteres ist sehr gängig und überaus effektiv um euren Vorsprung zu halten oder den Gegner umzulenken.


Für diese Variante eignen sich Größe-1-Regimenter, die möglichst günstig sind, deutlich mehr als Größe-2-Regimenter, weil diese verdeckt werden. Ansonsten besteht die Gefahr, dass der Gegner mit Modellen über seine Figuren schießt und eure Opfereinheit stirbt, ohne ihren Sinn erfüllt zu haben. Optimalerweise stellt man das Opfer-Regiment nur 1" vor dem Gegner auf, so kann dieser dazwischen kein anderes Regiment platzieren und muss die gesamte Aktion des blockierten Regiments darauf verwenden, mit Move Charge deine Truppen zu töten, ohne einen wirklichen Fortschritt im Szenario zu erhalten.


III. Umgang mit Todeszonen

In manchen Listen dominieren Magie und Beschuss, und es gibt Strategien, die darauf abzielen, euch mit überlappenden Feuerkorridoren das Leben schwer zu machen. Besonders die Dweghom sind hierbei große Meister und es ist wichtig zu wissen, welche Reichweiten euer Gegner realistisch beherrscht und wie viel Schaden er damit verursachen kann.

Betrachten wir erneut das Beispiel der Dweghom, die Beschuss auf 14, 16 und 18 Zoll haben, wobei der gefährliche mit Armor Piercing 2 auf 14 und 16 Zoll zu finden ist und nur Volley 2 hat. Das bedeutet, dass wir sicher sind, solange wir außerhalb dieser Reichweite plus der Bewegung des Gegners stehen. Dies ist in der Regel nur in den ersten Runden des Spiels möglich, da wir anschließend ins Szenario einsteigen wollen, aber dort auch umso wichtiger. Ich kann gar nicht zählen wie oft Leute ihre Regimenterin Aim Shoot Reichweite meiner Armbrüste aufgestellt haben und sich wunderten, dass dort Stands gehen. 

Irgendwann müssen wir natürlich in die Zonen und an den Gegner ran. Da ist es wichtig, dass wir Regimenter, die nach vorne wollen, spät aktivieren und bereits für die nächste Runde planen. Das bedeutet, dass wir entweder unsere eigenen Regimenter nutzen, um Sichtlinien zu blockieren, um Feuerkorridore einzuengen, oder unsere Position so wählen, dass der Gegner sich bewegen muss und keinen Zielenbonus erhält. Gerade bei sechs oder mehr Beschuss Regimentern ist das natürlich nicht so einfach, aber ihr dürft auf keinen Fall einzelne Regimenter früh reinschicken, wenn diese nicht sicher einen guten Tausch machen. Das Stichwort ist hier Zielüberlastung. Beim Deckbau liegen dann die Charaktere weit oben und wir schicken quasi erst nach drei vier Aktivierungen unsere Armee geschlossen in den Schlund der Hölle äh die Todeszone. Hilfreich ist es, wenn man den Gegner dazu zu verleiten kann sich zu bewegen, um ihn in der nächsten Runde sinnvoll angreifen zu können. Aber der Hauptzweck dieses einfachen Tricks ist es, dass der Gegner sein Feuer nicht auf einzelne Regimenter fokusieren kann und diese komplett rausnimmt. 

IV. Der Nahkampf und Zielauswahl

Irgendwann kommt leider der Punkt, wo wir uns dem Gegner stellen müssen, bevorzugt unter unseren eigenen Bedingungen und mit den richtigen Werkzeugen. Dabei ist es wichtig, dass wir im Kopf behalten, was auf dem Schlachtfeld passiert und wie wir welche Einheit besiegen. Im aktuellen "Meta" lautet die Antwort meist "Value of Attacks", aber es gibt natürlich auch Regimenter, bei denen höhere Cleave-Werte sinnvoll sind. Dabei hilft uns etwas so Böses wie Mathematik, um zu bestimmen, was effektiv ist und was nicht. Schätzt einfach im Kopf ab, wie viele Wunden ihr verursacht, und denkt daran, dass "Schnitt" 50% entspricht. Wenn ihr zum Beispiel 12 Angriffe auf 3+ habt und euer Gegner D3 R3, dann ergibt das im Schnitt 4 Lebenspunkte Verlust. Wenn auch nur eine Rüstung vom Gegner mehr besteht, sind es nur zwei Lebenspunkte Verlust. Ich selbst rechne immer konservativ minus eins pro fünf Treffern, dann klappt das nahezu immer.

Befreit euch von dem Gedanken, dass mein dicker Block / dickes Monster die wichtige gegnerische Figur töten muss. Ernsthaft, ich kann gar nicht oft genug betonen, wie oft ich gesehen habe, dass ein Apex in fünf Dragonslayer gerannt ist und sich gewundert hat, warum kaum Schaden verursacht wurde und der Apex nach Hause ging. Für diejenigen, die es nicht wissen, ein Apex hat Cleave 2 und Terrifying 2, Dragonslayer haben Hardened 2 und mit dem Lehrling sind sie furchtlos. Also hat der Apex 11 Angriffe auf die 4+ und die Dragonslayer dürfen mit D3 R4 W6 das Ganze stoisch hinnehmen und dann zurückschlagen. Schaut euch im Army Builder die Werte und Fähigkeiten der Dragonslayer an und schreibt mir gerne unten die Wahrscheinlichkeit auf, mit der der Apex diesen Kampf gewinnt. Ich rate mal und sage 2%. 

Meiner Meinung nach ist es fast immer besser mit den tollen Einheiten, dem Gegner eine Karte wegzunehmen, indem man ein unterlegendes Regiment tötet. Klar, dass ist kein fairer Kampf, aber man neigt dazu faire Kämpfe zu verlieren und daher sollte man versuchen die Waagschale ganz langsam in die eigene Richtung zu drücken. Wenn man dazu mit dem Regimenter außerhalb der sinnvollen Bedrohungsreichweite des Gegners befindet und weiter tänzelt ist das umso besser.  Bevorzugte Ziele sind hier Medium-Regimenter, die eigentlich nur alleine punkten wollen, oder leichte Regimenter mit Charakteren. Kartenvorteil ist in einem Spiel mit abwechelnden Aktivieriungen ein relevanter Punkt. 

V. Selbstreflexion und Einstellungen

Aktuell mache ich ~15 Spiele im Monat, ob bei Niederlagen oder vor allem bei Siegen, nehme ich mir die Zeit, das Spiel und meine Entscheidungen noch einmal zu reflektieren. Dabei ignoriere ich bewusst Faktoren wie Würfelglück oder die vermeintliche Über- oder Unterlegenheit meiner Armee. Diese sind oft die ersten Gründe, die einem Tabletop-Spieler in den Sinn kommen, um sich vor eigenen Fehlern zu verstecken.

Stattdessen frage ich mich: Welche meiner taktischen Entscheidungen waren nicht optimal, und wie hätte ich sie besser treffen können? Auch ich mache selten fehlerfreie Züge, und manchmal überwiegt einfach der Wunsch, etwas cooles zu tun. Klug ust das selten und in den meisten Fälle handelt es bei meinen Fehlern um Fehleinschätzungen bei Angriffen, Deckbau- oder Platzierungsfehler bzw. Bewegung meiner Einheiten. Besonders für weniger erfahrene Spieler kann es eine Herausforderung sein, taktische Fehler zu erkennen oder alternative Spielzüge zu identifizieren. Doch diese Fähigkeit entwickelt sich mit der Zeit und durch viel spielen. Das ist wie bei den meisten Dingen im Leben, durch üben wird man besser. Im Zweifel kann es da helfen die Züge mit dem Mitspieler offen durchzusprechen. Einfach zu fragen was er gerade am störensden finden würde und warum. In meinen Übungsspielen mit Nino ist das gang und gebe und es tauchen immer Optionen auf die ich nicht gesehen hatte oder gar nicht bedacht habe. 

Ein weiterer wichtiger Punkt, ist der Einfluss von Gedanken und Einstellungen auf das Spielgeschehen. Wenn ein Spieler bereits vor dem Spiel davon überzeugt ist, dass er sowieso verlieren wird, hat das keine positiven Auswirkungen. Im Gegenteil, es führt dazu, dass man weniger Mühe in seine Strategie investiert und nicht das volle Potenzial seiner eigenen Armee ausschöpft. Zudem übersieht man häufig taktische Fehler des Gegners, weil man sie als Teil eines vermeintlichen Masterplans betrachtet. Dies beobachte ich besonders oft bei Spielern, die gegen bestimmte Listenvarianten, Fraktionen oder gute Spieler spielen und innerlich bereits aufgegeben haben, anstatt sich auf deren Schwächen zu konzentrieren und einen Plan zu entwickeln. Auch hier gilt redet mit dem anderen. Im Zweifel seht das  ganze für euch selbst als Übung um beim nächsten Mal eine bessere Antwort zu haben. 

Turnierbericht aus Lübeck Spiel 3 Hundred Kingdoms vs Spire

Übersicht:
Spiel 1
Spiel 2
Spiel 3

Zuerst nochmal meine Liste zur Erinnerung und das Szenario:


Unkreativ [2000/2000]

The Hundred Kingdoms
Relentless Drill

== (Warlord) Priory Commander (Crimson Tower) [110]:
 * Order of the Ashen Dawn (3) [240]:
 * Order of the Ashen Dawn (3) [240]:
 * Order of the Crimson Tower (3) [215]: Standard Bearer

 * Order of the Crimson Tower (3) [200]:

== (Warlord) Imperial Officer [90]: Brace for Impact, On Your Feet
 * Mercenary Crossbowmen (3) [105]:
 * Mercenary Crossbowmen (3) [105]:
 * Men at Arms (3) [110]: Standard Bearer 


== Noble Lord [90]: Weapon Master, Graceful Combatant
 * Mercenary Crossbowmen (3) [105]:
 * Household Knights (3) [140]: Standard Bearer
 * Household Knights (3) [140]: Standard Bearer
 * Mercenary Crossbowmen (3) [110]: Standard Bearer

Und nun little Nickis Liste

Like nothing ever changed [2000/2000] The Spires The Directorate == High Clone Executor [130]: Infiltrator Variant * Force-Grown Drones (3) [90]: * Vanguard Clone Infiltrators (3) [170]: == (Warlord) Biomancer [140]: Master of Flesh * Force-Grown Drones (3) [90]: == Lineage Highborne [140]: Attracting Pheromones * Avatara (3) [165]: * Avatara (3) [165]: * Incarnate Sentinels (3) [210]: * Siegebreaker Behemoth (1) [190]: == Pheromancer [100]: Avatar Projection * Stryx (3) [120]: * Stryx (3) [120]: * Brute Drones (3) [170]: Die Liste mag merkwürdig erscheinen, aber sie verfügt über ziemliche viele Werkzeuge und Tricks, besonders wenn es um den Biomancer geht. Seine Fähigkeit, pro Runde ein Regiment als punktend zu zählen, ist nützlich, aber es wird kompliziert, wenn er das auch auf die Stryx anwenden kann. Da er Warlord ist kann das Regiment sich auf der anderen Seite des Schlachtfelds befinden und natürlich hat kann er jede Runde eine Dreifachaktivierung durchführen. Dazu noch ein Kugelhagel aus VCI mit Deadly Schüssen der sowies immer anstrengend ist. Letztes Mal im Wald haben sie mir zwei Ashen Dawn abgeschossen, was ärgerlich war, aber solche Dinge hinterlassen einen Eindruck. Ein weiteres Trauma war in dem Spiel der Siegebreaker, der mit UE und Burnout sofort auf Movement 10 Clash 5 kommt und einem ins Gesicht springt. Alles in allem also anstrengend. Wir starten in Runde eins, und ich bekomme zwei Crossbows, während er alles außer einem Regiment FGD bekommt. Er hat also sechs Karten zur Verfügung. Nachdem ich mich positioniert habe, platziert er je ein Regiment Stryx pro Flanke und den Rest in der Mitte. In Runde 2 erhalte ich Ritter, Man at Arms und die letzten Crossbows. Nick, die Brutes, FGD und einmal Avatara. Vier Karten Nachteil. Ich entscheide mich, über die rechte Flanke vorzurücken und meine Pferde dort zu platzieren, um möglicherweise die Stryx von einem Angriff abzuhalten. Doch ich ändere meinen Plan und stelle die Man at Arms auf die linke Flanke, da dort, wie erwartet, Stryx auftauchen und nicht von den Noble Lords und den Crossbows ausgelöscht werden. Es war ein Fehler, sie alleine auf der Flanke zu lassen, da ich wusste, dass das Objektiv mich stark behindern würde. Warum die trotzdem da standen kann wußte ich auch nicht mehr. Verdammte Vor-5-Minuten-Vergangenheits-Hanna. Seine Avatara marschieren auf der rechten Flanke vor und seine Brutes auf der linken. Als ich fertig bin, stärkt der Biomancer die Spire mit Buffs, was den Infiltrator mit UE die Möglichkeit gibt, meine Crossbows auszuschalten und dann in eine Zone zu ziehen, um zu punkten. Der geringe Schaden durch Decay wird sofort geheilt. 0:3
Runde 3 gibt es den Rest für Nick, da die Spire Flank für Brutes haben kann, und bei mir Ashen Dawn, Crimson Tower und Household Knights. Nick lässt mich weiter ins Leere laufen, während ich auf der rechten Flanke mit Move Charge die ersten Stryx angreife. Ich verursache zwei Schaden an ihnen und erleide vier durch Lethal Demise. Nicht wie geplant, aber ich schaffe es, die anderen Stryx mit den Crossbows zu eliminieren. Dann passiert eine Weile nichts, und ich muss die restlichen Ritter auf das Schlachtfeld bringen. Crimson und Household Knights auf der rechten und Ashen Dawn auf der linken Flanke. Dann ist Nick mit dem Rest dran und marschiert mit den Incarnates auf der rechten Flanke vor, setzt den Siegebreaker den Ashen Dawn gegenüber und die VCI erschießen fast einen Ashen Dawn im Wald, bevor sie sich 9" entfernen und der Schaden durch Burnout geheilt wird. Das fühlt sich nicht fair an. In Runde 4 muss ich langsam anfangen zu handeln. Ein neuer Plan muss her, da ich die anderen nicht konsequent zu Ende geführt habe. Ich beschließe, Druck auf der rechten Flanke auszuüben, da dort die Schlagkraft fehlt, die ich konsequent auf die linke Flanke gelegt habe. Also marschieren die anderen Crimson Tower und Ashen Dawn auf der linken Flanke vor. Keine Fragen dazu. Auch Nick schaute verwirrt rein und suchte nachdem Masterplan der dahinter steckte. Vermutlich lag das am Sigebreaker dem ich noch blutige Rache vom letzten Spiel schuldete.
Kurzm: Mein bisheriger Plan wird über Bord geworfen, und ich versuche, ihn anzulocken, aber er lehnt dankend ab. Seine Incarnates vernichten die Household Knights, und meine anderen Household Knights kämpfen gegen die Avatara, ohne viel Schaden zu verursachen, verlieren aber einen Reiter. Dann holt Nick sich einen Ashen Dawn mit den VCI und meine Crossbows erledigen zwei Avatara, was Platz schafft, um die Crimson an die FGD zu bringen. Nick schaut überrascht auf die Zone, die nun mir gehört. Er überlegt kurz ob er die Zone mit seinen FGD und den Biomancer halten soll, aber erklärt den für deutlich zu wertvoll um ihm zu verlieren. Daher bringt seinen Biomancer mit doppel March in Sicherheit hinter die Brute Drones.
In Runde 5 zünde ich meine Supremacy an und muss anfangen zu handeln, da es nicht gut läuft. Sir Nick überdenkt gefühlt 20 Minuten seinen Deckbau und versucht meine verdrehten Gedanken und Pläne zu durchschauen. Wenn er wüßte das ich gerade selbst keinen Plan hätte... naja, zur Sicherheit geht er nochmal auf Klo und kehrt dann blass und blutleer zurück, um gleich eine eins für den Startwurf zu würfeln. Klo... genau. Rituelle Opferungen um eine Abscheulichkeit zu beschwören mit der er einen dunklen Pakt eingegangen ist wohl eher.
Was nun folgt ist die Dreifachaktivierung, zuerst VCI mit UE, die mir zwei Crimson Tower erschießen, dann die zweiten Avatara mit Burnout, die meine Jungs festhalten. Ich überlebe mit 4 Leben und betrachte die rechte Flanke als verloren. Es gibt keine sinnvolle Option mehr, die VCI zu bekämpfen, also greife ich die Brute Drones an und verursache genug Schaden, dass nach der Heilung immer noch eine tot ist. Dann marschieren die Man at Arms vor die Ashen Dawn und hoffen, Siggi anzulocken, der dankend ablehnt. In der rechten Zone fallen dann die Household Knights und der Avatara, und ein Regiment Crossbows greift die VCI an.

Beginn Runde 6 und mir gehen die Optionen aus, und es ist klar, dass meine Crimson weiter auf die Brutes einschlagen müssen, bevor die Man at Arms helfen können. Nick aktiviert über den Biomancer die VCI und Avatara, die einen Teil meiner Truppen ausschalten. Am Ende der Runde haben die Brutes sogar ganze zwei Schaden mehr erlitten als sie geheilt hatten. Immerhin traut sich Siggi jetzt endlich in den Kampf und vernichtet die Man at Arms problemlos. Das eröffnet mir die Möglichkeit, mit drei Ashen Dawn anzugreifen, aber ich verursachte nur 8 Schaden. Dies reicht nicht um ihn zu besiegen. Viel wichtiger ist, dass Nick meine Crimson Tower bricht und dadurch mehr Stands in der Zone hat, während seine Stryx kurz davor stehen, meine ganz rechte Zone zu erreichen. Denn der Biomancer kann auch Stryx auf der anderen Seite des Schlachtfelds punkten lassen, wenn sie in einer Zone stehen. Nun, dass sieht schlecht aus aber wenn ich nächste Runde anfange und vieleicht den Siegebreaker töte... dann würde ich da eventuell noch was drehen können.

Runde 7 beginnt Nick und zündet wieder eine Dreifachaktivierung, wodurch Crimson und Ashen Dawn sterben. Meine letzten zwei Ashen Dawn machen einen Charge versuchen noch, Siggi zu töten, scheitern jedoch. Daraufhin gebe ich auf. Diese ständigen Dreifachaktivierungen zu Beginn waren einfach zu viel für die tapferen Menschen und das Spiel endet 2:64 Fazit: Lübeck war voller Freude, dass Nick obsiegt hatte, und ich überlegte, wie ich das Matchup verbessern könnte. Ein wichtiger Grund ist das mir diese Niederlage Munition gibt um ein dreiviertel Jahr lang über die Spire in Redbeards Gegenwart zu schimpfen. Aber am wichtigsten ist, dass Nick natürlich viel besser gewürfelt hat als ich und deswegen obsiegte. Das ist im Tabletop immer so, und die verdammte Dreifachaktivierung der Spire, die sie seit Jahren haben und die verdammt fies ist, ist natürlich auch schuld. Mein taktisches Genie war zweifellos fehlerfrei, und dass ich konsequent keinen Plan zuende brachte und mich zu weit aufteilte hatte nichts mit der Niederlage zutun. Meine Vorteille ausspielen indem ich mich konsequent auf einer Flanke fokussiere und beide Einheiten der Household Knights stumpf in die VCI opfern, um sie unter Kontrolle zu bekommen, wäre eine Option gewesen. Aber warum sollte man das tun?

Nach der Auswertung stellte sich heraus, dass ich mit einem SoS von 7 den besten SoS hatte und dafür sogar einen Treppchenplatz bekam. Platz 1 holte sich Nick mit den imba Spire, und Platz 2 ging an den gesalbten Hazlias Nino, der eine Armee aus ihm ähnlich geformten Bonegolems ins Feld führte.

Nachtrag: Nick wollte noch das ich das Foto von ihm mit dem Pokal einfüge. Stolz wie Bolle der kleine Nicki:


Montag, 26. Februar 2024

Tournament Report from Lübeck Game 2: Hundred Kingdoms vs. City States

Overview
Game 1
Game 2
Game 3

If anyone wonders why there are so few pictures, well, our friend Dennis has been diligently painting his Wadrhun during the evening Discord voice Channel for the past few weeks and could have presented them fully colored. Instead, he's opting for the gray City States. What did Nick call it again? Ah yes, Dennis is cosplaying the Wadrhun as City States. Just not in color.


Game 2, and once again against the City States. First, here's my list for reference:

Unkreativ [2000/2000]

The Hundred Kingdoms
Relentless Drill

== (Warlord) Priory Commander (Crimson Tower) [110]:
 * Order of the Ashen Dawn (3) [240]:
 * Order of the Ashen Dawn (3) [240]:
 * Order of the Crimson Tower (3) [215]: Standard Bearer

 * Order of the Crimson Tower (3) [200]:

== (Warlord) Imperial Officer [90]: Brace for Impact, On Your Feet
 * Mercenary Crossbowmen (3) [105]:
 * Mercenary Crossbowmen (3) [105]:
 * Men at Arms (3) [110]: Standard Bearer 


== Noble Lord [90]: Weapon Master, Graceful Combatant
 * Mercenary Crossbowmen (3) [105]:
 * Household Knights (3) [140]: Standard Bearer
 * Household Knights (3) [140]: Standard Bearer
 * Mercenary Crossbowmen (3) [110]: Standard Bearer

Dennis' list (cheekily stolen from Discord).

Ari Van Guard  [1995/2000]
The City States

== (Warlord) Aristarch [170]: Atalanta's Spear, Expert Scouts
 * Satyroi (3) [200]:
 * Selinoi (3) [130]:
 * Selinoi (3) [130]:
 * Agema (3) [195]: Xypharchos

== Polemarch [150]: Primodynamic Globe, Blades of Eakides, Disorienting Strikes
 * Agema (4) [245]: Xypharchos
 * Minotaur Haspists (3) [180]:
 * Minotaur Haspists (3) [180]:
 * Selinoi (3) [130]:

== Mechanist [80]:
 * Thorakites (4) [205]: Xypharchos, Minotaur Thyrean Auxiliary

Dennis had taken the nasty new stuff from the City States, but the two-handed cows were missing. That relieved me massively internally and immediately set my plan for the game. There was simply no realistic chance of me scoring well against that setup in the first three or four rounds, since I had decided against the Sealed Temple in the list and didn't want to split myself up either. Dennis' army is incredibly fast on the board and can jump right into my face, so I have to stay back and wait until the Ashen Dawn are there. Without the two-handed cows, only the Cleave 4 Polemarch poses a serious problem if I don't let myself be charged by both Agema simultaneously.

We played Breakout:

In the first round, I got a Crossbows and Dennis got two Selinoi and the Mechanic with Thorakites. Since he out-activated me, I opted for the flank with the forest to be protected from the Selinoi's shots. Additionally, it put his objective within my shooting range in case he wanted to go for it. I didn't plan on scoring points myself until round 5, so I just had to make it as annoying for him as possible until then. As he wanted to score in peace, he deployed everything to the other flank, and I accepted that. The fewer losses I suffer at the beginning, the better it will be for me later on.


In round two, I received one Household Knights, Crossbows, and Man at Arms each, while he got Agema and, of course, the Minotaurs. Everything on my side continued marching obediently on the left side, preparing the flank. He positioned his Agema behind a hill there, as he didn't want me to annoy them with light crossbow fire. In my opinion, they would have been the better unit to put within 21" of the zone, but instead, he used the trick with the cows. On the other side, the Mechanic desired a different unit as a scoring option and was leading significantly with 0:7.

In round three, he got everything, and I got everything except for one Ashen Dawn and Crimson Tower card each. It was exhausting and could have gone badly, especially as the other Agema and Selinoi advanced on the left flank. However, since he positioned the other cows centrally and aimed for the objective and the zone, I agreed to it. My army continued marching forward on the right, and a unit of Crossbows somehow moved strangely onto the field from the side. When he activated his Satyroi, he realized there was no sensible option to appear from the left flank. So, they chose the long way around, and I just innocently asked what exactly could kill a few Crimson Towers on the right flank, positioning them conveniently within charge-clash range. Naturally, more Agema continued marching into the left zone, further extending his lead. 0:14.
 
In round four, the rest of my units arrived, and both of us utilized our Supremacy. Dennis started. First, the cows charged into the Ashen Dawn, but then he realized he had blocked his own path and could only engage two of them. So, the Ashen Dawn survived, and on the other side, the Crimson Towers took out his Thorakites and positioned themselves in the zone. On the flank, the remaining cows and an important unit of Man at Arms died. As a result, neither of us controlled the zone, but I managed to tie down the Selonoi with Move Charge from the Household Knights. Holding one zone would have been enough, but thanks to the Agema and the other Selinoi, the objective marker fell, and Dennis held the center. Annoying, but I still had more than enough time, and now two fresh units of knights were finally coming in, ready to slaughter anything that stood in my way. 4:19.

Round five: The weakened Ashen Dawn fell victim to the Polemarch Agema with Cleave 4, while the other Agema targeted my Noble Lord. However, surprisingly, they decided to forgo their Clash action to only engage my Crimson Tower with a Move Charge. Dennis obviously hoped to survive this action and continue scoring. However, the devastating attacks from the Crimson Tower, the Noble Lord, and the Melee Crossbows swept away the Agema with Aristarch, and from that point on, it was downhill for him. I threw my remaining units at him and held back my heavy knights. Unfortunately, I had to give up the zone on the right flank to destroy regiments, but that didn't matter to me, as they had planned to break through to the center anyway. So, I only scored 2 points, while Dennis got 6. However, a 6:23 lead for Breakout wasn't enough for round five.

In the next round, unfortunately, Dennis started first, resulting in the loss of my Household Knights. However, my two regiments of Crimson Towers had free rein to sweep through his army without consequence. Each of their attacks meant the death of a regiment, and he massively hindered himself, granting me incredible freedom. In the end, only two Minotaurs remained in the central zone, which I only gained control of in the following round. Nevertheless, my lead of 8:27 still wasn't enough.

So, I waited until the Minotaurs made their move and then eliminated them. I secured the objective and all three zones. By round seven, it was 20:27, and finally, round 10 ended with a score of 47:27.

Dennis seemed to struggle with the new movement tricks of the City States. However, when you receive a 50% buff, strength naturally overwhelms you. He clearly won his other games as well, resulting in both City States having a record of 2:1.

 
Previously, I had been ridiculed for mainly testing against City States. However, especially with Lupus, I had a good sparring partner who thoroughly put my weak Hundred Kingdoms through the wringer. But the way things turned out was purely coincidental and had nothing to do with the test games. After all, I also had test games against Old Dominion and Spire, and the results were similarly devastating. However, since my sparring partners had backed out there, there was only one game for each faction. It wouldn't be so bad, but my potential opponents for Round 3 were Nino and Nick. On Declined Flank, Old Dominion would be my preferred, albeit poor, matchup. Against Nick, however, I saw no winning option in the scenario. We had only played it once, but in Round 5, I was tabled with zero points because the new Siegebreaker and Biomancer are quite bold. Fortune turned away from me, and it came to the matchup weak Kingdoms vs imba Spire. The report on that will follow in a few days.