Hey everyone,
Last Sunday we were in Braunschweig for a gaming meetup. Besides a game with Icemann, who had only finished one or two figures per regiment and whose army therefore didn’t look impressive, I also played a match against Dweghom.
It’s no secret that I’m currently not very enthusiastic about the Hundred Kingdoms. The changes at the beginning of the year were personally too minor for me. The Ashen Dawn are too strong, and apart from the Sealed Temple, I find the rest mediocre at best. I’m also longing for new toys and more variety, as I’ve played too many games with the old stuff. Since Uziel isn’t willing to lend me his Nords for tournaments at the moment, I need to make a choice. On Friday, I led brave people with sticks against Nauth’s Spire. It went okay, so I took the same list to Braunschweig.
The Hundred Kingdoms
== (Warlord) Priory Commander (Sealed Temple) [110]:
* Order of the Sealed Temple (3) [205]: Standard Bearer
* Order of the Sealed Temple (3) [205]: Standard Bearer
* Order of the Ashen Dawn (3) [265]: Standard Bearer
* Order of the Ashen Dawn (3) [250]:
== (Warlord) Imperial Officer [90]: Brace for Impact, On Your Feet
* Mercenary Crossbowmen (3) [105]:
* Mercenary Crossbowmen (3) [105]:
* Hunter Cadre (4) [245]: Veterans, +1 Volley, Standard Bearer, Null Mage
* Men at Arms (3) [105]
== Chapter Mage [105]: School of Fire, Focused
* Mercenary Crossbowmen (3) [105]:
* Mercenary Crossbowmen (3) [105]:
Four units of Crossbows, a Veteran Hunter, and a Chapter Mage can deal quite a bit of ping damage. What bothers me about the list is that, aside from the Chapter Mage, there’s no Cleave/AP 2, and it currently seems that almost all significant opponents are running with Hardened, Loose Formation, or Tenacious. This doesn’t bode well for the relatively weak shooting of the Hundred Kingdoms. On the other hand, I only really need higher damage against Old Dominion at the moment.
Dweghom
== Tempered Steelshaper [120]:
* Hold Warriors (3) [130]:
* Steelforged (3) [210]:
== Ardent Kerawegh [120]: Invocation of the Shattering
* Flame Berserkers (3) [180]: Standard Bearer
* Wardens (3) [205]: Standard Bearer
== (Warlord) Tempered Sorcerer [135]: Magma School, Hellbringer Sorcerer
* Fireforged (3) [180]:
* Hellbringer Drake (1) [200]:
== Tempered Sorcerer [135]: Magma School, Hellbringer Sorcerer
* Fireforged (3) [180]:
* Hellbringer Drake (1) [200]:
The Dweghom list includes four characters, including a Magma Sorcerer as the Warlord. Personally, I’m not a fan of having four characters, except maybe the Steelshaper Warlord and the Nickdorate list that Nick leads with his Spire. However, the Dweghom's spellcasters and priest work very efficiently for their points.
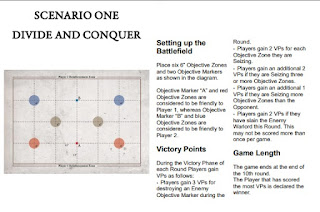
The Dweghom were allowed to choose the scenario and opted for close combat. The Dweghom favor Killpoints because my units tend to melt away under their shooting, especially the five light regiments. However, the Drakes are not fond of the Hunter Cadre and Crossbows, which slowly strip away their tokens. My advantage is that, according to statistics, I’ve played more games against Dweghom than any other faction, so I have a good understanding of where I need to position my forces. However, I haven’t played Hundred Kingdoms in recent months, and without continuous practice, mistakes happen. So, I took this as a good opportunity to practice.
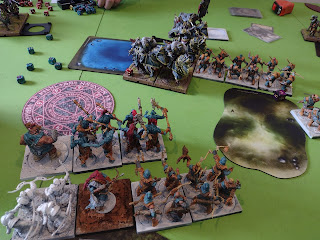
In the first round, the Dweghom deployed the Ballista with the Steelshaper in the center and the Berserkers with the Ardent on the right. I brought in four of my light regiments and positioned them heavily on the right flank. I wanted to avoid seeing a Drake on this flank so that I could maneuver my cavalry across it. After a brief inspection of the Hunter Cadre, the Dweghom decided not to place any Drakes there in the second round, even though they had many tokens. The Fiend Hunter and a mountain of crossbows can indeed be quite deterrent.
In the second round, all my units except the heavies came in, while the Dweghom deployed both Drakes and the Fireforged. The Drakes moved first, but since he wanted to cast spells for tokens, I stayed at a distance. I almost completely wiped out the Berserkers and positioned Sealed Temple on both flanks, securing a small and a large zone and gaining a nice lead of 7 points.
In the third round, we both drew our remaining cards, and unfortunately, the Dweghom got to go first. The Ardent first tried to prevent my Sealed Temple from scoring, then the Berserkers gathered and went into the Hunter Cadre. At least I managed to shoot them down effectively, and the Drakes advanced only slowly, so I didn’t need to rush to inflict significant damage on his army. Essentially, it was a cautious probing and token collection by the Dweghom. I considered whether I could win with the small lead by simply reinforcing the right flank. As the Dweghom concentrated more on the left, this strategy became even more attractive, but it’s generally better to be proactive rather than reactive. Therefore, I slightly pulled back the Sealed Temple on the left and moved the Crossbows into the large left zone to deny it. Opposite them were the Fireforged and the Drake, which now couldn’t pivot away. The Sealed Temple and Ashen Dawn remained just out of reach. So, although I had only one zone, I gained a small card advantage that might allow me to position my army in the Dweghom fortress in the next round. Once the Ashen Dawn receive Hardened through Supremacy in the following round, the shooting should be manageable. By the time the Dweghom could destroy my army, I would have collected enough points from the zones to make Killpoints irrelevant. 14:0
In the fourth round, I deployed a unit of Crossbows at the top, then all the characters, more Crossbows, and finally the Knights at the bottom. I got to go first and charged the Crossbows into the Fireforged to prevent them from advancing. Since both Fireforged were in front of the Drakes, it took a while for the three stands to be eliminated. Otherwise, everything else moved slowly as the Dweghom had great respect for my shooting and the Knights, which threatened all zones. Once the relevant Dweghom activations were done, I made a double move into the small central zone of the Dweghom and positioned my Ashen Dawn within auto-charge range of a Drake and the Ballista. On the other side, the Sealed Temple moved into the zone, and the Ashen Dawn charged the flank of the Fireforged to bring death and devastation. Naturally, they also kept a toe in the zone to ensure that I scored in all zones this round. 26:2
Besides the Supremacy, my deck building for this round was straightforward: Ashen Dawn, Sealed Temple, Ashen Dawn, Archers, Characters, and the final Sealed Temple. The Dweghom went first, and a Drake with a lot of tokens attacked the middle Ashen Dawn. He rolled poorly while I rolled well, so none of my riders died. I activated the left Ashen Dawn, who eliminated the Fireforged from this level, and I lost one stand due to the subsequent shooting from the second Drake. Unfortunately, my Sealed Temple’s Move Charge failed and was punished by the Fireforged. So far, it had been rather mixed, and the second Drake survived with 2 health points, which the remaining shooting couldn't change. I missed the successful charge against the left Drake to draw tokens, making things tricky. Since the Steelshaper chose not to give a damage penalty to the Ashen Dawn in front of the Drake, they survived the Wardens' charge. I had also tried to prevent this with the Chapter Mage’s Crossbows, but the Holdt Ballista simply shot them down. Nevertheless, the round was more than successful, and I scored again in three zones. 38:6
In the sixth round, I built my deck similarly to before. If I could prevent the Dweghom from entering a zone this round and possibly eliminate the Warlord, that should mathematically be enough. That was my rough thought process. I got to go first, and the Warlord fell to the Ashen Dawn. A Sorcerer was positioned up top with the Dweghom, and it had to be the smaller one trying to wound the Ashen Dawn. He managed to inflict a handful of damage, but not enough. Instead of charging the Drake with the Sealed Temple, I decided to go for the flank of the last Fireforged. While the Drake would easily laser them from the flank, the Ashen Dawn were a much tastier target, and my goal was to keep him out of the zones. I also hoped for two dead stands of Fireforged but only got one. Surprisingly, the Fireforged went instead of the Drake and reformed, attacking the Sealed Temple. My Ashen Dawn fell to the Drake, which moved back to avoid a charge, and then things continued in the center. There, the Ashen Dawn received an armor penalty from the Steelshaper and endured the attacks from the Wardens and then the Fireforged. I was almost a bit embarrassed. Then, the Hunter Cadre and the second Sealed Temple took out the Ballista with the Steelshaper, and we called it a game. Although I was expected to lose the remaining Ashen Dawn and a Sealed Temple regiment in the next round, the final score was 54:6 (12), and before round eight, the Dweghom wouldn't manage to control more than one zone.
Final Thoughts:
Uziel has played Dweghom for a long time, and even though we currently see few Dweghom players at tournaments up north, this matchup is one I’ve played frequently and have a good sense of how to approach. If you position poorly in this matchup, your units can quickly get into trouble—just like my Chapter Mage did. Despite this, the game went well for me overall, though I realized I haven't played against Dweghom enough recently.
A significant advantage was that the Dweghom didn’t dare to advance aggressively, which allowed me to prevent them from scoring by strategically holding back my army. Ultimately, this highlights that practice and experience are crucial. My opponent, who normally fields a very stylish City States army (as seen in Game Report 1 from the Münster tournament this year), has only recently started with Dweghom. It was encouraging to see that he has already painted quite a bit, as I’ve been facing many grey armies lately due to an influx of new players.
Overall, it was an insightful game and a great opportunity to refine my strategies further. I’m looking forward to more games and challenges that the upcoming tournaments and encounters will bring.

.jpeg)


.jpeg)

.jpeg)


.jpeg)

.jpeg)
.jpeg)
.jpeg)
.jpeg)

.jpeg)
.jpeg)
