Dienstag, 31. Oktober 2023

Battlereport Kelpie Con Tournament Game 1: Hundred Kingdoms vs Spire (english)

Overview:
Game 1
Game 2 & 3

Like previous years, we were at Kelpie Con again and instead of a fancy demo table, there was, for once, a tabletop tournament. Due to the many positive feedback from participants, guests and the Con Orga, we are currently considering making it much larger next year and possibly taking place over both days. More on that on the German Discord and T3. For the link to the Kelpie - Con T3 page just click here.


I thought about what I should play at the tournament for a long time and after every sample list disappointed me massively, I decided on a similar variant of the Silent Seeker because I wanted to test it out. He actually still had banners with the Ashen Dawn and Militia Bowmen instead of Rangers, but I like the guys with the cloaks. Plus there's a lot of feel-good stuff and goblins aren't an option when Head to Head is in the pool.

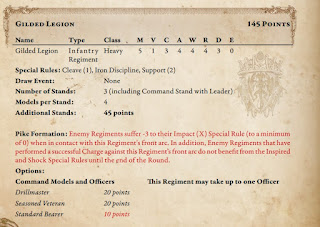
Kelpie Con  [2000/2000]
Relentless Drill

 == (Warlord) Imperial Officer [75]: On Your Feet, Fire First, Aim Later
* Mercenary Crossbowmen (3) [105]:
* Imperial Ranger Corps (3) [120]:

 == Noble Lord [80]: Weapon Master
* Mercenary Crossbowmen (3) [110]: Standard Bearer
* Mercenary Crossbowmen (3) [105]:
* Household Knights (3) [140]: Standard Bearer

 == (Warlord) Priory Commander (Crimson Tower) [110]:
* Order of the Crimson Tower (3) [215]: Standard Bearer
* Order of the Ashen Dawn (3) [240]:

After Nino unpacked a Fallen Devinity meme list on the day of the tournament and Uziel slapped together a makeshift list from his new Nords, which he hadn't played for a week and only briefly twice, I wanted to look for one of the Lübeck players as a claim. The first one to come over was Nick and he's always happy when he can stomp my poor, brave Humans into the ground. Since he had also packed the appropriate list for this, it was rather counterproductive, but at least I had already played the Grind them Down scenario once before.

SP Stryx HCE Rush LH [2000/2000]
The Directorate

 == (Warlord) High Clone Executor [160]: Biotic Hive, Infiltrator  Variant, Burrowing Parasites, Disperse, Additional Neural Receptors
* Bound Clones (3) [120]:
* Vanguard Clone Infiltrators (5) [290]:

== Pheromancer [100]: Avatar Projection
* Stryx (3) [120]:
* Stryx (3) [120]:
* Brute Drones (4) [200]:

== Lineage Highborne [140]: Attracting Pheromones
* Avatara (3) [165]:
* Incarnate Sentinels (3) [210]:

On lap 1 both of us had lights except one and where he oriented more to the left I moved to the right and held the center slightly offset. Nick looked at my stuff and overlooked the fact that my Lord was in crossbows with a banner and could run directly into the zone in front of the VCI next round because I simply didn't select him. In round two I of course chose the Crossbows with Lord as an automatic selection and got a regiment of knights while Nick only got his Pheromancer with Brutes. Lord and knight go left, the lord takes the zone and I take a comfortable 7:4 lead.

Round 3 I get everything except a Heavy and am delighted, but with Nick I get everything except a Medium and I send my Household Knights into the VCI. They inflict 5 wounds and the VCI retreat, shoot from their backs and turn around again. Thanks to absurd armament rolls, I can withstand the hail of fire with only 4 wounds and also the batch of Brute Drones with exactly one life. Nick takes a small stand on the right because he sees the Ashen Dawn coming and has tremendous respect for the Crossbows. So I get two zones again by simply sending my Imperial Officer to the other side of the battlefield with double time and expand my lead to 14:5.

Round 4, Nick thinks I'm in his nasty trap and ignites his Supremecy. Through the three activations, the Incarnates on the right entangle my Rangers, the Stryx in the middle entangle my Crossbows, and the Brutes on the left entangle the Crossbows with the Lord. I cheer inside and explain to Nick that this is going to hurt a lot and he shouldn't do that because knights will wipe out the Incarantes. We discuss the move for a while, as we have often played similar matches and the Seek new Escort trick doesn't worry him either. Especially when his avatar on the right also reaches the crossbows in the forest with move charge and he sees my army disintegrate in two rounds. I joke around that he's the only Spire player I never see using burnout and it feels like nothing ever happens. Nick rolls the 9 decay dice and places 7 wounds on the avatar with the words: I'm used to worse. Slightly stunned, I almost feel bad for what I'm about to do and let my commander jump into the far right Ashen Dawn. Then Operation Living Shield starts, the Rangers and the central Crossbows retreat, die in the process and both Ashen Dawn charge into the opponent. The Incarnates simply burst and with the Stryx I do 5 damage each to myself and them. On the far right comes the second block of horses and I the Reform Crimson Tower eat a few brutes. Nick tries to bind the Ashen Dawn with the second Stryx so that you don't hit the flank of his second, centrally positioned Incarnates and also makes his Bound Clones appear right. His left avatars run in front of the far left zone on my side because my Crimson Towers are already ready to be cleared. Somewhere in between the VCI shoot the Lord and I only score my desired zone and Nick scores three zones without a desired zone. 19:9

I start round 5, fire my Supremacy and my middle Crimson Towers kill the remaining Brute Drones without Inspire and get the charge against the middle Incarnates. With Blessed I land 7 hits and inflict 11 wounds. the last brave activates Crossbows and does exactly one damage and the regiment is broken. Nick now spoils the game by getting his high clone onto the mound and out of the zone with Fluid Formation. This will almost wipe out the central Crimson Towers, but he won't score. Since my second Crimson Tower then tries, manages and wipes out the absurd move Charge against the left avatars, Nick gives up and goes to buy new dice. We agree on 25:10


Freitag, 27. Oktober 2023

Spielbericht lucky Knights gegen lucky Volva

Eine Woche bis zur Kelpie Con und ich wußte noch immer nicht was ich spielen sollte. Nachdem Lara aka LA1 sich schon die Tage davor für ein Übungsspiel gemeldet hatte, kam heute das Rematch und ich entschied mich eine ähnliche Liste wie aus den USA mit 5 Heavys zu testen. 

[2000/2000]
== Imperial Officer [75]: On Your Feet, Fire First, Aim Later
* Mercenary Crossbowmen (3) [110]: Standard Bearer
* Mercenary Crossbowmen (3) [105]:
* Steel Legion (5) [315]: Veterans, +1 Clash, Standard Bearer, Drillmaster

== (Warlord) Priory Commander (Crimson Tower) [165]: Armor of Dominion, Long Lineage
* Order of the Crimson Tower (3) [215]: Standard Bearer
* Order of the Ashen Dawn (5) [380]:
* Order of the Ashen Dawn (4) [310]: 

[2000/2000]
== Blooded [100]: Crow
* Ugr (3) [150]:
* Trolls (4) [240]:
* Stalkers (3) [160]:
* Fenr Beastpack (4) [180]: 

== Konungyr [120]: Dragon
* Bow-Chosen (4) [270]:
* Ice Jotnar (1) [260]:
* Huskarls (4) [235]: Skald, Thegn

== (Warlord) Volva [90]:
* Valkyries (4) [195]: 

Lars wollte etwas neues testen und ich schaute mir voller Verwirrung seine Liste an. Irgendwie wirkte das alles nur so halb durchdacht und von der Volva als Warlord hielt ich auch nicht viel, aber er meinte es gibt einen Plan und so bauten wir Grind them Down auf.

In Runde 1 kamen der Konungyr in den Bow Chosen auf der linken Flanke und der Blooded mittig in den Stalkern. Ich entschied mich meine Crossbows alle auf der rechten Flanke kommen zu lassen, da ich erst in Runde 3 die ersten weiteren Regimenter kriegen würde. 
In der nächsten Runde kamen bei ihm zum Glück nur die Huscarls, Hunde und Valkyren und ich erschoss einen Stand Stalker. Kurz hatte ich überlegt in zwei Zonen zu rennen um ihm diese zu verweigern, aber ich wollte meine Crossbows nicht wegwerfen, wenn ich nur so wenig Regimenter auf der Platte habe. 4:8

Runde 3 kam sein Rest außer ein Regiment Ugr und bei mir zwei von insgesamt fünf Heavys. Wir positionierten uns, ich erschoss einen weiteren Stand Stalker und leider lagen seine Bow Chosen unten. Seine Fenris Wölfe machten einen Move Charge um mich zu ärgern und die Zone zu halten und nach längeren überlegen platzierte ich den 5er Ashen Dawn Block mit Commander auf die linke Flanke. Ich war mir sicher dass er nicht so gut Würfeln das die nach Hause gehen und dann würden die Ashen Dawn einfach durch alles dort durchgehen und ich müßte nur noch schauen was auf der rechten Flanke passiert. Da ich auf 14,1 war mußte er sich etwas bewegen und machte den Ashen Dawn auch gleich 8 Schaden. Mit einem flauen Gefühl im Bauch ging es dann in Runde 4 und er vergrößerte den Punkteabstand auf 2:16


Runde 4 kam von uns beiden der Rest und ich wollte anfangen, da ich auf keinen Fall eine weitere Schussphase der Bow Chosena abbekommen wollte. So geschah es auch und die Ashen Dawn schafften es mit den Impacts einen Stand Bow Chosen zu töten. Großartig. Nicht das was ich erwartet hatte und dazu noch doppelt dumm, weil ich den fiesen Ice Jotnar nur geringe Beachtung geschenkt hatte. Der schlug auch sogleich in der Flanke ein und begrub alle meine Hoffnungen, aber Lars töte mit ihm keinen Ritter. Stattdessen mußten der Konungyr und die Bow Chosen ran und die Ritter auf zwei zu reduzieren. Irgendwie war das so nicht richtig und dann durften meine Crossbows auch solide 12 hits gegen die Fenrir im Nahkampf landen und schickten zwei nach Hause, weil wenn ich schon absurd gut auf die 2 Würfel darf er das natürlich auch. Da wir gerade bei absurden Würfeln sind ging auch noch der letzte Stalker und die Trolle nahmen den Platz in der Zone ein. Die waren knapp 13" entfernt und ich entschied mich den Charge Clash zu probieren, da ich ansonsten nichts genug Schaden gegen die Trolle mache und natürlich kam die 6 und drei Stands Trolle gingen nach Hause. Dank dieser taktischen Meisterleistung hatte ich plötzlich eine Zonen und konnte beruhigt meine zweiten Ashen Dawn mittig platzieren und die zweiten Crimson Tower auf der rechten Flanke und links erschienen mit 16" Bewegung die Steel Legion um direkt in eine Zone zu laufen. Das machte den Rückstand minimal besser. 5:21

Runde 5 ich war gierig nachdem Erfolgen der letzten Runde und durfte auch gleich anfangen und die Steel Legion sammelte einen Ice Jotnar Schädel. Voller Vorfreude sah ich die Flanke mein sein und als meine Ashen Dawn dann zuschlagen durften gingen auch zwei Stands nach Hause. Nur zwei Stands, der dritte klebte noch gerade so am Leben. Damn you Evasion 2! Der Konungyr und der letzte Chosen malten sich das Blut ihrer gefallenen Kameraden ins Gesicht und lachten einmal laut als meine Ashen Dawn im Gegenschlag einfach aus der Geschichte getilgten wurden. Was im Namen von Hazlia stimmt mit denen nicht?
Auf der anderen Seite lief es nicht wirklich besser und Lars war mir immer eine Aktivierung im Plan voraus wodurch ich zwei Regimenter Crossbows verlor und seine Wölfe auch noch in die Ashen Dawn gekommen sind. Natürlich gelingt es mir mit Blessed nicht die Hunde zu erschlagen und via Move Charge blockierten die Ugr meine rechten Crimson Tower und ich kam mir ziemlich schlecht vor, weil ich schon wieder nur zwei Zonen hatte, aber immerhin galt das gleiche auch für Lars. 9:25

In Runde 6 durfte Lars dann wieder anfangen und die Bow Chosen bzw der letzte mit dem Konungyr sagten einen charge gegen die Steel Legion an und töteten nur vier Legionäre. Ganz kurz hatte ich den Angstschweiß auf der Stirn dass das Regiment einfach auch zerplatzt. Dann verließ Lars das Glück und meine Crimson Tower erschlugen die Ugr, die Ashen Dawn die Hunde, die Trolle gingen auch nach Hause und die Steel Legion entledigte sich des Konungyrs. Nun waren nur noch die Huscarls und die Valkyren auf dem Feld und ich sollte bald schon auch punkten dürfen. Noch gab es aber nur wieder fünf Punkte für jeden. 14:30


Wo ich mir die Bilder so anschaue weiß ich gar nicht mehr warum die Huscarls erst in Runde 7 die Steel Legion mit einen charge bedachten. Auf jeden fall kostet mich das nur fünf Leben trotz Flanke und im Reform holte ich mir weiteren Schaden so das ich mit nur noch zwei Stands gegen die Huscarls schlagen durfte. Das war eher durchwachsen, aber ich nahm ihn einen Stand. Auf der anderen Seite tauschten wir Valykren gegen Crimson Tower und ich holte mir die obere, rechte Zone mit den anderen Crimson Tower, weil ich die mir ausgesucht hatte. So näherte ich auf bequeme 20:31

Und weil wir noch nicht genug absurde Würfel in diesem Spiel hatten fing ich natürlich an und erschlug in Runde 8 die restlichen Huscarls. Dadurch konnte ich mich ausruhen und bequem drei Mal fünf Punkte farmen und mit 35:31 unverdient gewinnen. Immerhin hatten wir beide die Erkenntnis gewonnen, dass wir diese Listen nicht ein weiteres Mal spielen werden.


Battlereport lucky Knights vs lucky Volva (english)

One week until Kelpie Con and I still didn't know what to play. After Lara aka LA1 had reported for a practice game the days before, the rematch came today and I decided to test a similar list to the USA with 5 heavys.

[2000/2000]
== Imperial Officer [75]: On Your Feet, Fire First, Aim Later
* Mercenary Crossbowmen (3) [110]: Standard Bearer
* Mercenary Crossbowmen (3) [105]:
* Steel Legion (5) [315]: Veterans, +1 Clash, Standard Bearer, Drillmaster

== (Warlord) Priory Commander (Crimson Tower) [165]: Armor of Dominion, Long Lineage
* Order of the Crimson Tower (3) [215]: Standard Bearer
* Order of the Ashen Dawn (5) [380]:
* Order of the Ashen Dawn (4) [310]: 

[2000/2000]
== Blooded [100]: Crow
* Ugr (3) [150]:
* Trolls (4) [240]:
* Stalkers (3) [160]:
* Fenr Beastpack (4) [180]: 

== Konungyr [120]: Dragon
* Bow-Chosen (4) [270]:
* Ice Jotnar (1) [260]:
* Huskarls (4) [235]: Skald, Thegn

== (Warlord) Volva [90]:
* Valkyries (4) [195]: 

Lars wanted to test something new and I looked at his list in confusion. Somehow it all seemed half-thought out and I didn't think much of Volva as a warlord, but he said there was a plan and so we set up Grind Them Down.

Round 1 saw the Konungyr in the Bow Chosen on the left flank and the Blooded in the middle in the Stalkers. I decided to have all my Crossbows come on the right flank, as I wouldn't get the first more regiments until turn 3.

Luckily, in the next round he only had the Huscarls, Dogs and Valkyren and I shot a Stand Stalker. I briefly considered running into two zones to deny him that, but I didn't want to throw away my crossbows when I only have so few regiments on the board. 4:8

Round 3 was the rest except for one Ugr regiment and two of my total of five Heavys. We positioned ourselves, I shot another Stand Stalker and unfortunately his Bow Chosen was down. His Fenris Wolves made a move charge to annoy me and keep the zone and after some consideration I placed the 5 Ashen Dawn block with Commander on the left flank. I was sure that he wouldn't roll the dice so well that they would go home and then the Ashen Dawn would just go through everything there and I would just have to look at what was happening on the right flank. Since I was at 14.1 he had to move a bit and did 8 damage to the Ashen Dawn. With a sinking feeling in his stomach he went into round 4 and increased the points gap to 2:16


Round 4 was the rest of both of us and I wanted to start because I definitely didn't want to get another round of shots from the Bow Chosena. That's what happened and the Ashen Dawn managed to kill a Stand Bow Chosen with the Impacts. Great. Not what I expected and doubly stupid because I had paid little attention to the nasty Ice Jotnar. It immediately hit the flank and buried all my hopes, but Lars didn't kill any knights with it. Instead, the Konungyr and the Bow Chosen had to go and reduce the knights to two. Somehow that wasn't right and then my Crossbows were allowed to land a solid 12 hits against the Fenrir in close combat and sent two home because if I was absurdly good on the 2 dice, of course he was allowed to do that too. Since we're talking about absurd dice, the last stalker went and the trolls took the place in the zone. They were almost 13" away and I decided to try the Charge Clash since otherwise I don't do enough damage against the trolls and of course the 6 came and three stand trolls went home. Thanks to this tactical masterstroke I suddenly had a zone and could calmly place my second Ashen Dawn in the middle and the second Crimson Towers on the right flank and on the left the Steel Legion appeared with 16" movement to run directly into a zone. That made the gap slightly better. 5:21


Round 5 I was greedy after the successes of the last round and was allowed to start right away and the Steel Legion collected an Ice Jotnar skull. Full of anticipation, I saw the flank being mine and when my Ashen Dawn was allowed to strike, two Stands also went home. Only two stands, the third one was barely clinging to life. Damn you Evasion 2! The Konungyr and the last Chosen painted their faces with the blood of their fallen comrades and once laughed out loud as my Ashen Dawn were simply erased from history in retaliation. What in the name of Hazlia is wrong with them?

On the other hand, things didn't really go any better and Lars was always one activation ahead of me, which meant I lost two regiments of Crossbows and his wolves also ended up in the Ashen Dawn. Of course I didn't manage to kill the dogs with Blessed and the Ugr blocked my right Crimson Tower using Move Charge and I felt pretty bad because I only had two zones again, but at least the same applied to Lars. 9:25

In round 6 Lars was allowed to start again and the Bow Chosen or the last one with the Konungyr announced a charge against the Steel Legion and only killed four legionnaires. For a very short time I had a sweat of fear on my forehead that the regiment would simply burst. Then Lars's luck ran out and my Crimson Tower killed the Ugr, the Ashen Dawn killed the dogs, the trolls also went home and the Steel Legion got rid of the Konungyr. Now only the Huscarls and the Valkyren were left on the field and I should soon be able to score points too. But there were still only five points for each. 14:30.


Looking at the pictures, I no longer know why the Huscarls didn't give the Steel Legion a charge until round 7. In any case, it only cost me five lives despite the flank and in the reform I took further damage so that I was only able to beat the Huscarls with two standings left. It was rather mixed, but I took him one stand. On the other hand, we swapped Valykren for Crimson Tower and I got the upper right zone with the other Crimson Towers because I chose them. So I approached a comfortable 20:31

And because we didn't have enough absurd dice in this game, of course I started and killed the remaining Huscarls in round 8. This allowed me to rest and comfortably farm five points three times and win undeservedly with 35:31. After all, we both came to the realization that we wouldn't be playing these lists again.

Gilded Legion - Unit Guide

Gilded Legion - Unit Guide
Eine der drei restricted Auswahlen des Imperial Officers und  lt. Hintergrund eine der am besten ausgebildeten Gruppen der Hundert Königreiche und der ursprüngliche Grund warum ich die Fraktion angefangen habe. Die sind der Inbegriff von tapferen Menschen mit Stöckern.


Übersicht & Spielweise


Im Wesentlichen bekommen wir eine vergleichsweise günstige Auswahl mit durchschnittlichen Werten und die leide Heavy ist. Außer dem R4 fällt nichts besonders auf und außerhalb der Ordensritter finden wir dies bis zum Erscheinen der Sicarii auch nirgendwo. Ihre Hauptaufgabe ist das "der Igel wohnt jetzt hier"-Prinzip, sprich gegen Feinde so lange wie möglich aushalten und eventuell sogar gewinnen. Mit Clash 3, was gut für Infanterie ist und Cleave 1 klappt das auch mit dem zurückhauen ganz gut und Dank Pike Formation (Gegner profitieren im Charge nicht von inspire, shock und machen 3 Impacts pro Stand weniger) wollen einige Gegner nicht Frontal in die Legion. Dank Iron Discipline sind aber auch Flanken und Rückenangriff nicht ganz so schlimm, aber die Pike Formation wirkt da nicht.

Ihre Hauptschwächen sind die mittelmäßige Rüstung von 3 und das sie eine schwere Auswahl mit Movement 5 sind. Beides kann durch Officers ausgeglichen werden, aber leider kann man nur einen einpacken. Der Seasoned Veteran gibt Bastion 1 (nicht kombinierbar mit den Bastion von Imperial Officer) und der Drillmaster gibt Double Time und +1 Attacke für jeden Stand (nicht aber für die Support-Angriffe). Welchen Officer man möchte ist etwas abhängig davon wie man die bauen möchte und ob sich ein Imperial Officer der Truppe anschließen soll. Ohne angeschlossenen Charakter würde ich immer den Seasoned Veteran wählen und den Drillmaster nur als Upgrade, wenn ich einen großen Block mit angeschlossenen Charakter habe. Wenn der Charakter mit "Armour of Dominion" drin steht kann man sich einfach stumpf 1" vor die meisten Monster stellen und sagen: komm doch. Die finden so einen Charge ohne Inspire, ohne Cleave, mit kaum bis keinen Impacts gegen D3/R4 meist nicht toll. Aber umdrehen ist dann auch nicht mehr fürs Monster. Wichtig wenn man so was versucht, sollte man den Block 3 schmal spielen, weil die "Armour of Dominion" nur funktioniert, wenn der gegnerische Stand in Kontakt mit dem Stand des  Charakter ist.  Warum schreibe ich D3/R4 wenn wir doch über Bastion verfügen? Nun mit Bastion ist das so eine Sache, da man das Regiment dafür zuerst aktivieren muss um es zu erhalten. Das ist oft ein großer Nachteil, da die Jungs nicht zwingend früh ins Geschehen eingreifen möchte und wir erhalten auch kein Bastion in dem Zug indem wir auf das Spielfeld marschieren, da Draw Events von außerhalb des Spielfelds nicht ausgelöst werden. Ohne Bastion sind wir gegen den hochkarätigen Beschuss der Spire, Wadhrun und Nords sehr anfällig, weil dort viele Regiment kein Problem mit Move Shot haben.

Veterans
Da wir eigentlich immer einen Officer möchten, im Zweifel den Imperial Officer der uns aber keinen Boni für Veteran gibt, sind die Kosten für +1 Clash gering und der Nutzen bei größeren Blöcken immens. Rein vom Schadensoutput ändert sich zwischen Relentless Drills und Veteranen bei der Gilded Legion nicht, jedenfalls bis die ersten Verluste kommen. Außerdem kann man mit Clash 4 eventuell das Inspire und damit die rerolls sparen um nachdem Clash eventuell eine Move Aktion zu machen um über die erschlagenden Feinde auf eine Zone zu laufen. 

Relentless Drills
Support ist im Grunde eine schlechte Regel, da es fast immer besser ist ein Regiment breit zu stellen statt tief. Bis zu 5 breit ist, auf den meisten Spielfeldern, absolut legitim und man verliert dabei keine Attacken. Da die Gilded Legion und Household Guard  allerdings bereits Support 2 haben, kann man hier auf Support 3 kommen und hat nur einen Verlust von einer Attacke pro Stand. Da Relentless Drills nichts kostet ist  es gerade bei größeren Blöcken eine interessante Wahl, wenn man knapp bei Punkten ist oder Veterans für seine Liste nicht möchte.

Aber was spielen wir den jetzt und brauchen die zwingend einen Charakter? Das kommt ganz auf den eigenen Geschmack und die ihnen zugedachte Aufgabe an. Dabei erfüllen kleine Regimenter von 3 Stands, kleine Blöcke von 5-6 Stands oder große Gewaltblöcke von 9 -10 Stands andere Aufgaben und in jedenfalls ist die Supremacy vom Imperial Officer sehr zu empfehlen, da die ohne Vanguard einfach nicht gut sind. Kleine Regimenter sind eher zum Abdecken und sollten günstig gehalten werden, mittlere fungieren als Amboss und können auch gerne einen Charakter mit "Armour of Dominion" enthalten. Dadurch kann man sich auch den Seasoned Veteranen und/oder Drillmaster sparen. Wenn man Gewalt möchte kann man 9-10 Stands spielen, diese fünf Stands breit und zwei Reihen tief als Block spielen. Als  Veteranen machen die schon gut Druck und mit Drillmaster marschieren die mordend über die Platte, kostet aber auch einen Berg an Punkten. Und ich würde vermutlich einen Imperial Officer alleine für das Bastion in den Mörderblock einpacken, weil das Regiment sonst zu schnell schrumpft. Was da natürlich auch hilft wäre ein Noble Lord mit "Best of Men" in die Nähe oder wenn man sich für den Seasoned Veteran entscheidet im Regiment selbst. Aber das erfordert die Warband des Lords und man hat mit der Household Guard eine sehr ähnliche Auswahl als Medium.

Fazit: Wurde vor dem Update kaum gespielt und auch jetzt sieht man sie auch sehr selten. Das hat mehrere Gründe: Ihre beiden Aufgabengebiete Hammer oder Amboss werden an anderen Regimentern einfach besser erfüllt. Mit der Steel Legion streiten sich in einer unserer besten Warbands um einen restriced Slot und diese hat einfach mehr Cleave und mehr Attacken. Als Amboss müßten sie stets erst aktivieren um Bastion zu zünden und bräuchten daher meiner Meinung nach mindestens Untouchable oder etwas anderes/weiteres. Da hilft es auch nicht, dass Ashen Dawn existieren wo 8 Stands Gilded Legion mit Seasoned Veteran genauso viel wie 5 Stands Ashen Dawn kosten und genauso viele Leben haben. Dass ihre beiden Konkurrenz - Regimenter ebenfalls heavy sind hilft auch nicht gerade und so bleiben sie in beiden Fällen nur die zweite Wahl.


Gilded Legion - Unit Guide (english)

Gilded Legion - Unit Guide
One of the three restricted selections of the Imperial Officer and, according to the background, one of the best trained groups in the Hundred Kingdoms and the original reason why I started the faction. They are the epitome of brave humans with sticks.


Overview & gameplay


Essentially, we get a comparatively cheap selection with average values and which is unfortunately heavy. Apart from the R4, nothing particularly stands out and outside of the Knights of the Order we don't find this anywhere until the appearance of the Sicarii. Your main task is the "the hedgehog lives here now" principle, i.e. to hold out against enemies for as long as possible and maybe even win. With Clash 3, which is good for infantry, and Cleave 1, hitting back also works quite well and thanks to Pike Formation (opponents don't benefit from inspire, shock in the charge and make 3 impacts less per stance), some opponents don't want to go head-on into the legion . Thanks to Iron Discipline, flanks and rear attacks aren't quite as bad, but the pike formation doesn't work there.

Their main weaknesses are the mediocre armor of 3 and being a heavy pick with Movement 5. Both can be offset by officers, but unfortunately you can only pack one. The Seasoned Veteran gives Bastion 1 (cannot be combined with Imperial Officer's Bastion) and the Drillmaster gives Double Time and +1 Attack for each Stand (but not for the Support Attacks). Which officer you want depends somewhat on how you want to build it and whether you want an Imperial Officer to join the force. Without an attached character I would always choose the Seasoned Veteran and the Drillmaster only as an upgrade if I have a large block with an attached character. If the character has "Armor of Dominion" in it, you can simply stand 1" in front of most monsters and say: come on. They usually find a charge without Inspire, without Cleave, with little to no impact against D3/R4 not great. But then turning around is no longer for the monster. Important if you try something like that, you should play block 3 narrowly, because the "Armor of Dominion" only works if the opponent's stance is in contact with the character's stance . Why do I write D3/R4 when we have Bastion? Well with Bastion it's a problem because you have to activate the regiment first to get it. This is often a big disadvantage because the guys don't necessarily go into the game early Events want to intervene and we don't get a Bastion on the turn by marching onto the field, since draw events from outside the field are not triggered. Without Bastion we are very vulnerable to the high-caliber fire from the Spire, Wadhrun and Nords, because there are many there Regiment have no problem with Move Shot.

Veterans
Since we actually always want an officer, in case of doubt the Imperial Officer who doesn't give us any bonuses for veteran, the costs for +1 clash are low and the benefit with larger blocks is immense. Purely in terms of damage output, there is no change between Relentless Drills and Veterans in the Gilded Legion, at least until the first losses occur. In addition, with Clash 4 you can possibly save the Inspire and thus the rerolls in order to possibly do a move action after the Clash to run over the slaying enemies into a zone.

Relentless drills
Support is essentially a bad rule, as it is almost always better to deploy a regiment wide rather than deep. Up to 5 wide is absolutely legitimate on most playing fields and you don't lose any attacks. However, since the Gilded Legion and Household Guard already have Support 2, you can get to Support 3 here and only have a loss of one attack per stand. Since Relentless Drills cost nothing, it is an interesting choice, especially for larger blocks, if you are short on points or doesn't want Veterans for his list.

But what do we play now and do they necessarily need a character? That depends entirely on your own taste and the task you have in mind. Small regiments of 3 stands, small blocks of 5-6 stands or large force blocks of 9-10 stands fulfill other tasks and in any case the Supremacy of the Imperial Officer is highly recommended, as they are simply not good without Vanguard. Small regiments are more for covering and should be kept cheaply, medium ones act as an anvil and can also contain a character with "Armor of Dominion". This means you can also save yourself the Seasoned Veteran and/or Drillmaster. If you want violence you can play 9-10 stands, five stands wide and two rows deep as a block. As veterans, they put a lot of pressure on and with Drillmaster they march across the board with murder, but it also costs a mountain of points. And I would probably pack an Imperial Officer alone for the Bastion in the murder block, otherwise the regiment would shrink too quickly. What would of course also help would be a Noble Lord with "Best of Men" nearby or if you choose the Seasoned Veteran in the regiment itself. But that requires the Lord's Warband and you have a very similar selection with the Household Guard Medium.

Conclusion: It was hardly played before the update and even now you rarely see it. There are several reasons for this: their two areas of responsibility, hammer and anvil, are simply better fulfilled in other regiments. One of our best warbands, the Steel Legion, is fighting for a restricted slot and they simply have more cleaves and more attacks. As an anvil, you always have to activate first in order to ignite Bastion and therefore, in my opinion, you would need at least Untouchable or something else/further. It doesn't help that Ashen Dawn exists where 8 stands of Gilded Legion with Seasoned Veteran cost the same as 5 stands of Ashen Dawn and have the same number of lives. The fact that their two competing regiments are also heavy doesn't help either and so they only remain the second choice in both cases.


Donnerstag, 26. Oktober 2023

Imperial Officer - Einheitenguide für die Hundred Kingdoms

Imperial Officer - Unit Guide


Ein häufiger Anblick unter den tapferen Menschen ist der Taktiker und Befehlshaber der professionellen Armee der Hundert Königreiche. Er greift selbst eher selten an, bereichert jedoch die Armee mit Fähigkeiten, die wir anderswo nicht finden können, und unterstützt die aktuelle Elite-Infanterie der Menschen..  

Übersicht:

  • ProfilwerteMit einer defensiven Statistik von D3 R3 und 4 Wunden sucht der Offizier keine direkten Duelle. Sein wahres Potenzial zeigt sich in den beiden Battle Drills, von denen sein Regiment jede Runde zwei durchführen darf, sowie in seiner Supremacy, die die Infanterie der Hundred Kingdoms halbwegs spielbar macht. Ingesamt ist er aber mit 90 Punkten recht teuer und das neue Forward Force, das dem Regiment, dem er sich anschließt, Flank gibt, gleicht das nur bedingt aus. Wobei es natürlich gerade der schweren Infanterie zugutekommt. 
  • Battledrills
    • Brace for Impact - Gewährt Bastion 1, was bedeutet, dass die Einheit des Charakters +1 Rüstung (D) erhält. Sehr solide, jedoch nicht kumulativ mit dem Bastion vom Seasoned Veteran, da beide Bastion 1 und nicht Bastion +1 sind. Grundsolide und am besten geeignet für Einheiten mit bereits hohem Rüstungswert.
    • On your Feet - Gewährt Double Time, was besagt, dass wir, wenn wir zweimal in dieser Runde Move als Aktion gewählt haben, als Gratisaktion einen dritten Move ausführen dürfen. Situationsabhängig und eher unbeliebt. Persönlich oft meine erste Wahl, da Bewegung Spiele gewinnt.
    • Fire First, Aim Later - Gewährt Fire and Advance, was es uns erlaubt, eine zusätzliche Move-Aktion als dritte Aktion auszuführen, wenn die zweite Aktion eine Volley-Aktion war. In Kombination mit Double Time kann man beispielsweise Move Volley Move Move machen. Dadurch kann man z.B. 5" nach vorne gehen, schießen und insgesamt 5" zurückgehen. Oder man schiebt eine lästige Fernkampfeinheit des Gegners in die Reihen und greift sie dann von der Seite an.
    • Aim for the Head - Wenn man Aiming ansagt und der Gegner sich in 12" Entfernung befindet, verursachen die Fernkampftreffer ebenfalls Moralsschaden. Die Anwendung ist nicht einfach, aber wenn man es hinbekommt, kann das Ergebnis vernichtend sein.
  • Warband. Neben den Standardtruppen wie Man at Arms, Militia und Crossbows hat er die Ranger als eigene Mainstay und er unsere drei Elite-Infanterieregimenter ins Feld führen. Gerade die beiden Legionen profitieren doppelt von seinen Fähigkeiten, und abgesehen von den Ordensrittern ist dies unser bester Kriegstrupp.
  • Supremacy: Seine Supremacy gewährt bis zu zwei Infanterieregimentern pro Runde die Vanguard-Regel. Ob der Offizier auf dem Feld ist, bereits erschlagen wurde oder irgendwo herumlungert, spielt keine Rolle. Die Optionen dazu sind vielfältig:
    • Viele Zonen sind 15" von der eigenen Kante entfernt, daher können Infanterieeinheiten mit einer Bewegung von 5" direkt in diese Zonen laufen.
    • Mit dem Vanguard Move kann eine Fernkampfeinheit auf das Feld laufen, zielen und schießen oder laufen, laufen, schießen
    • Schwere Infanterie ist meist sofort dort, wo sie benötigt wird, und muss nicht erst ein paar Runden laufen.
    • Lassen Sie Regimenter gerne auch von der Seite kommen, damit Sie weiterkommen, denn die Drehungen sind günstiger, und viele Zonen sind so schneller erreichbar.
    • Ein Chapter Mage / Theist Priest kann zaubern, wenn sich das Regiment auf dem Feld befindet. Daher kann plötzlich ein sehr weiter Fire Dart, Holy Fire usw. den Gegner unvorbereitet treffen
       
Ausrüstungen & Spielsweise:
  • Masteries: Dank des Wegfalls der Gefolge können wir jetzt ohne Einschränkungen Masteries wählen, aber da wir bereits Flank von Haus aus haben, sind die meisten davon für den Imperialen Offizier nicht interessant. Sollte man ihn von einem mangelhaften zu einem schlechten Nahkämpfer machen wollen, kann er mit Eccentric Fighting Style +2 Attacken und Rerolls erhalten. Das ist jedoch nur selten die Punkte wert. Ansonsten lohnt sich noch Marksmanship, welches einem Charakter mit Fernkampfangriffen +2 Barrage gibt.
  • Erbstücke Support: Mit der Option auf zwei Erbstücken kann man schon einiges anfangen, leider sind die meisten Erbstücke der Hundert Königreiche mangelhaft oder sehr teuer. Am beliebtesten sind die Armor of Dominion und die Standard of Steel. Die Rüstung lässt alle gegnerischen Einheiten in Kontakt die Sonderregeln Smite und Cleave verlieren. Wichtig: Dies gilt nicht für Brutal Impact, und in Duellen muss der Offizier in direktem Kontakt zum Gegner stehen. Die Standarte gibt Dread, was gegnerischen Regimentern in Kontakt verbietet, von Inspire zu profitieren. In Kombination mit Bastion erhöht das die Stabilität unserer Regimenter sehr, ist aber sehr speziell und macht den Officer sehr teuer.
  • Erbstücke Fernkampf: Alternativ kann man einen Schützen aus ihm machen, um Ranger, Crossbows oder Hunter zu unterstützen. Leider hat der Offizier nur Volley 2 und Movement 5 und reduziert damit die Bewegung von Rangern und Huntern, wenn er sich ihnen anschließt. Außerdem ist die einzige Option für den Fernkampf "The Kiss Farewell" für 30 Punkte. Dies gibt dem Offizier 3 Schüsse mit einer Reichweite von 18" und Deadly Shots. Als weiteres kann man ihm die Mastery "Marksmanship" für 15 Punkte geben, dies gibt ihm zwei weitere Schüsse. Achtung! Aktuell ist der Eintrag im Armybuilder nicht korrekt, im Armeebuch steht der richtige. Das Marksmanship der Hundert Königreiche ist leider schlechter als das der Wadrhun. Interessant kann das jedoch sein, weil man mit Fire and Advance und Double Time Move, Shoot, Move, Move machen kann. Das klingt auf den ersten Blick sehr situativ, erlaubt aber absurde taktische Manöver und fast immer Schüsse in die Flanke des Gegners.

Fazit: Der Imperial Officer ist ein vielseitiger und entscheidender Bestandteil der Streitkräfte der Hundert Königreiche. Mit seinen Fähigkeiten spiegelt er den Taktiker und Befehlshaber der Armee gut wieder und seine Battle Drills verleihen den Einheiten taktische Vorteile und seine Supremacy ermöglicht es, Infanterieregimenter effektiv auf dem Schlachtfeld zu positionieren. Leider bringt er kein gutes Offensiv Potenziall mit und seine Battle Drills sind häufig nur nett oder zu langsam (Bastion). Ob man ihn mit zusätzlichen Ausrüstungen und Fähigkeiten ausrüsten möchte ist eine Glaubenfrage, dennoch ist das Gesamtpaket brauchbar und eine lohnende Investition für jeden, der auf eine starke Infanterieeinheit setzt.

Imperial Officer - Unit Guide (english)

 Imperial Officer - Unit Guide


A common sight among the brave people is the tactician and commander of the professional army of the Hundred Kingdoms. He himself rarely engages in combat, but enriches the army with skills that cannot be found elsewhere, supporting the current elite infantry of the people.

Overview:

  • Profile Values: With defensive statistics of D3 R3 and 4 wounds, the officer does not seek direct duels. His true potential lies in the two Battle Drills, of which his regiment is allowed to perform two each round, as well as in his Supremacy, which makes the infantry of the Hundred Kingdoms somewhat playable. Overall, he is quite expensive at 90 points, and the new Forward Force, which gives Flank to the regiment he joins, only partially offsets this. However, it naturally benefits heavy infantry.
  • Battledrills
    • Brace for Impact - Grants Bastion 1, meaning the character's unit receives +1 armor (D). Very solid, but not cumulative with the Bastion from the Seasoned Veteran, as both are Bastion 1 and not Bastion +1. Fundamentally solid and best suited for units with already high armor value.
    • On your Feet - Grants Double Time, stating that if we have chosen Move as an action twice in this round, we may perform a third Move action as a free action. Situation-dependent and rather unpopular. Personally, often my first choice, as movement wins games.
    • Fire First, Aim Later Grants Fire and Advance, allowing us to perform an additional Move action as a third action if the second action was a Volley action. In combination with Double Time, for example, one can perform Move Volley Move Move. This allows, for example, to move 5" forward, shoot, and then move a total of 5" back. Or push an annoying enemy ranged unit into the ranks and then attack it from the side.
    • Aim for the Head When declaring Aiming and the opponent is within 12" distance, ranged hits also cause morale damage. The application is not easy, but if you manage to do it, the result can be devastating.
  • Warband: In addition to standard troops such as Man at Arms, Militia, and Crossbows, he has the Rangers as his own Mainstay and can lead our three elite infantry regiments into the field. Especially the two legions benefit twice from his abilities, and apart from the Order Knights, this is our best warband.
  • Supremacy: His Supremacy grants the Vanguard rule to up to two infantry regiments per round. Whether the officer is on the field, has already been slain, or is lurking somewhere does not matter. The options for this are diverse:
    • Many zones are 15" away from our edge, so infantry units with a movement of 5" can run directly into these zones.
    • With the Vanguard Move, a ranged unit can run onto the field, aim and shoot, or run, run, shoot. Heavy infantry is usually immediately where it is needed and does not have to run for a few rounds first.
    • Feel free to let regiments come from the side so they can progress further, as the turns are cheaper, and many zones are thus reachable more quickly.
    • A Chapter Mage / Theist Priest can cast spells when the regiment is on the field. Therefore, a very distant Fire Dart, Holy Fire, etc. can suddenly hit the opponent unprepared.
       
Equipment & Gameplay:
  • Masteries: Thanks to the removal of the entourage, we can now choose masteries without restrictions, but since we already have Flank by default, most of them are not interesting for the Imperial Officer. If you want to turn him from a deficient to a bad melee fighter, he can receive +2 attacks and rerolls with Eccentric Fighting Style. However, this is rarely worth the points. Otherwise, Marksmanship is still worthwhile, which gives a character with ranged attacks +2 Barrage.
  • Heirlooms Support: With the option for two heirlooms, you can already do a lot, unfortunately, most heirlooms of the Hundred Kingdoms are deficient or very expensive. The most popular ones are the Armor of Dominion and the Standard of Steel. The armor makes all enemy units in contact lose the special rules Smite and Cleave. Important: This does not apply to Brutal Impact, and in duels, the officer must be in direct contact with the opponent. The standard gives Dread, which prohibits enemy regiments in contact from benefiting from Inspire. In combination with Bastion, this greatly increases the stability of our regiments, but is very specific and makes the officer very expensive.
  • Heirlooms Ranged: Alternatively, you can turn him into a shooter to support Rangers, Crossbows, or Hunters. Unfortunately, the officer only has Volley 2 and Movement 5, thus reducing the movement of Rangers and Hunters if he joins them. Also, the only option for ranged combat is "The Kiss Farewell" for 30 points. This gives the officer 3 shots with a range of 18" and Deadly Shots. Additionally, you can give him the Mastery "Marksmanship" for 15 points, which gives him two more shots. Caution! Currently, the entry in the Armybuilder is incorrect, the army book has the correct one. Unfortunately, the Marksmanship of the Hundred Kingdoms is worse than that of the Wadrhun. However, this can be interesting because with Fire and Advance and Double Time, you can Move, Shoot, Move, Move. This sounds very situational at first glance, but allows absurd tactical maneuvers and almost always shots in the opponent's flank.

Conclusion: The Imperial Officer is a versatile and crucial part of the forces of the Hundred Kingdoms. With his abilities, he reflects the tactician and commander of the army well, and his Battle Drills give the units tactical advantages, while his Supremacy allows effectively positioning infantry regiments on the battlefield. Unfortunately, he does not bring good offensive potential and his Battle Drills are often only nice or too slow (Bastion). Whether you want to equip him with additional equipment and abilities is a matter of belief, but the overall package is usable and a worthwhile investment for anyone relying on a strong infantry unit.

Hundred Kingdoms Armeersonderregeln

Die tapferen Menschen der Hundert Königreiche verfügen über drei mehr oder weniger nützliche Sonderregeln wobei wir uns stetes zwischen Relentless Drill und Veteran entscheiden müssen.

Dynastic Alliances
Wir dürfen zwei Warlords stellen mit allen Vor- und Nachteilen die daraus resultieren. Sprich, wir haben eine zweite Supremacy Ability und wir geben bei Melee und Head to Head zwei Mal die Punkte für den Warlord ab. Wichtig: der Priory Commander zählt unabhängig des Ordens als das gleiche Modell. Genauso der Noble Lord zu Fuß oder auf Pferd. Daher darf eine Armee nicht von einem Noble Lord zu Fuß und einem auf Pferd  befehligt werden.
Die die meisten Supremacys der hundert Königreiche nur nett sind, läßt sich damit nur bedingt viel anfangen. Aber haben ist stets besser als brauchen.

Relentless Drill
Alle Infanterie Regimenter bekommen Support (2) bzw +1 wenn sie bereits Support haben. Das ist kostenlos bringt nur selten etwas und wird bei mir nur gewählt, wenn ich keine Veteranen nutzen möchte oder viele auf Militia, Household Guard und Gilded Legion setze, weil diese Stands aus den hinteren Reihen dann 3 Attacken mitbringen. Sprich, ich kann die auch schmal stellen und mich besser bewegen.

Veterans

Beliebig viele Regimenter dürfem zu Veteranen aufgewertet werden, wenn sie über einen Officer und eine Standarte verfügen. Veteranen haben +1 Clash oder +1 Volley. Natürlich kriegen wir das nicht umsonst, da sich die Kosten des Officers bei Veteranen verdoppeln und wir den Boni nur bekommen, wenn die Einheit wirklich eine Standarte UND einen Officer dabei hat. Das geht schnell in die Punkte da viele der Officer eher durchwachsen sind, aber erlaubt auch mit unseren wenigen Attacken sicher zu treffen. 

Regimenter die Veteranen werden dürfen:

  • Household Guard
  • Men at Arms
  • Militia
  • Militia Bowmen
  • Mounted Squire
  • Household Knights
  • Gilded Legion
  • Hunter Cadre
  • Steel Legion

Pauschal zu sagen mach die oder die Einheit immer zu Veteranen zu machen ist schwierig und ist stark von der Anwendung abhähngig und wird bei den Regimentern direkt beleuchtet werden.

Hundred Kingdoms Army Rules (english)

The brave people of the Hundred Kingdoms have three more or less useful special rules whereby we always have to choose between Relentless Drill and Veteran.

Dynastic Alliances
We are allowed to have two warlords with all the advantages and disadvantages that result from that. In other words, we have a second Supremacy Ability and we give up the points for the Warlord twice in Melee and Head to Head. Important: the Priory Commander counts as the same model regardless of the order. Likewise the Noble Lord on foot or on horseback. Therefore, an army cannot be commanded by one Noble Lord on foot and one on horseback.
Since most Supremacists in the Hundred Kingdoms are just nice, there's only so much you can do with it. But having is always better than needing.

Relentless Drill
All infantry regiments get support (2) or +1 if they already have support. This is free and rarely does anything and is only chosen for me if I don't want to use veterans or if I rely a lot on Militia, Household Guard and Gilded Legion, because these stands from the back rows then provide 3 attacks. In other words, I can make them narrow and move better.

Veterans
Any number of regiments can be upgraded to veterans if they have an officer and a standard. Veterans have +1 Clash or +1 Volley. Of course we don't get this for free, as the cost of the officer doubles for veterans and we only get the bonus if the unit actually has a standard AND an officer with it. This quickly gets to the point as many of the officers are rather mixed, but it also allows us to hit safely with our few attacks.

Regiments that are allowed to become veterans:

  •  Household Guard
  • Men at Arms
  • Militia
  • Militia Bowmen
  • Mounted Squire
  • Household Knights
  • Gilded Legion
  • Hunter Cadre
  • Steel Legion

 Saying in general that this or that unit should always become veterans is difficult and depends heavily on the application and is directly examined in the regiments guide.

Mittwoch, 25. Oktober 2023

Chapter Mage – Einheitenguide für die Hundred Kingdoms

Chapter Mage – Unit Guide

Einer der seltener gespielten Helden der Hundert Königreiche der mit dem September 23 Update vielleicht die letzte relevante Nische verloren hat. Wir werden uns die verschiedenen Schulen und die, meiner bescheidenen Meinung nach, brauchbarsten Builds anschauen und die nützlichen Tricks die sie mit auf das Schlachtfeld bringt. Denn lt. Hintergrund sind die Chapter Mages keine Schlachtfeld dominierenden Zauberer wie die der Dweghom. Die der Menschen sind eher schwach und können mit dem richtigen Zauber zum richtigen Zeitpunkt die Waagschale gerade so weit kippen, dass die Königreiche als Sieger hervorgehen. Dies wurde zugegeben gut ins Tabletop übertragen – leider.

Überblick


  • ProfilwerteFür 90 Punkte bekommt man einen guten Schütze und immerhin Mage 6. Die restlichen Werte sind erst Mal sehr unterwältigend und zeigen, dass dieser Held nicht in den Nahkampf und erst recht in kein Duell möchte. Vor allem der sehr geringe Resolve - Wert ist sehr lästig.
  • Warband: Wir haben ausschließlich Zugriff auf Man at Arms und Crossbows und dam Die sind okay, aber verdammen den Chapter Mage mit einer der schlechtesten Warbands im Spiel. 
  • Supremacy: Die Protective Glyphs Supremacy ist eine passive Fähigkeit durch die alle eigenen Regimenter als in Interference Reichweite zählen, sprich -1 auf die Zauberangriffwürfe des Gegners. Gut gegen die meisten kleinen Priester/Zauberer die nicht Arcane 3 und Focus haben. Außerdem darf er jeden Spruch mit Reichweite Self auch auf 8" auf ein Regiment seiner Wahl zaubern. Dies ist in einem Fall sogar ziemlich hilfreich.
  • Magie Schulen: jede Chapter Mage kennt alle Sprüche von genau einem Element und die beiden Sprüche Elemental Vortex und Elemental Missile.
    • Erde - Stones Spikes Self, 1-3 und der Gegner verliert 2 Impacts, wenn er das Regiment mit einen charge angreift. Sehr situativ und gegen Regimenter wie Tunder Rider oder Crimson Tower leider irrelevant.
    • Erde - Earth to Mud Reichweite 16", auf die 1-3 mit Scaling. Bei Erfolg darf ein gegnerisches Regiment die Aktionen March oder Charge nur als erste Aktion wählen. Das ist super um gegnerische Nahkämpfer zu behindern, aber eben auch sehr situativ. Wichtig: der Zauber hält nur bis zum Ende der Runde.
    • Feuer - Fire Dart Reichweite 14" und auf 1-3 wird pro Erfolg ein Armor Piercing 2 Hit auf die Zieleinheit verteilt. Merke: Magie verursacht Moraltests.
    • Feuer - Kindle Courage Reichweite Self, Scaling, gibt dem Regiment des Casters +1 Resolve und inspiriert. Das ist nett und wie bei fast allen Buffs zu schwierig anzubringen.
    • Wind - Guide Self auf die 1-3 mit Scaling und man darf alle sechsen im Beschuss rerollen. Nett, aber auch hier stehen die Kosten nicht im richtigen Verhältnis zum Nutzen.
    • Wind - Seeking Winds Self auf die 1-3 mit Scaling. Das Regiment bekommt +1 Barrage. Nur selten interessant, weil der Magier recht hochpreisig ist und die Regimenter und weitere Stands meist günstig
    • Wasser - Call Fog Reichweite Self und Scaling. Der Gegner verliert einfach die Hälfte seiner Fernkampfangriffwürfe auf das Zielregiement und das ganze zählt nicht als Obscured
    • Wasser - Ninuahs Tears Reichweite Self, pro 1-3 heilt das Regiment des Magiers ein Leben + 2. Bei 6 Würfeln sind das 5 Leben die man heilt. Mit Focus 6 sogar ganze sechs. Das ist brauchbar solange kein gegnericherer Magier in 10" zum Zielregimet ist und die Einheit nicht gebrochen ist. Außerdem darf man Resolvewürfe von 6 bis zum Ende der Runde wiederholen. 
    • Elemental Vortex Reichwete 12 mit Attunement 4, Gegner brauchen zwei zusätzliche Erfolge um das Zielregiment anzuzaubern. Meist zu langsam, aber nett zu haben.
    • Elemental Missile Reichweite 12 und das Ziel bekommt einfach 3 Hits ab. Das ist nett, aber auch nicht wirklich mehr. Trotzdem hilfreich, wenn man Mal sonst gar nichts anderes zutun hat.


Ausrüstungen & Spielsweise:
  • Masteries: Neben absurden Spielerein wie dem Nahkampfzaubererer ist Focus offensichtlich die sinnvollste Wahl. Das wiederholen von zwei misslungenden Würfel ist für 15 Punkte eine sehr gute Option. Die andere sinnvolle ist Front Line Tactican welches Flank gibt. Nur halt Flank auf Mat at Arms oder Crossbows...
  • Erbstücke Support: Die Support Builds sind mit dem Wegfall von Seek new Escort fast komplett verschwunden und nur selten habe ich noch jemanden mit Eye of Akelus spielen sehen. Das gibt dem Chapter Mage ein Draw Event womit ein Fernkampf Regiment 6er Rerollen kann. Kostet leider 35 Punkte, ansonsten würde ich einen Windmagier mit dem Auge als Supporter vielleicht sogar gut finden.
  • Erbstücke Fernkampf: erwähnenswert sind hier nur The Unwrought, und das auch nur weil es 5 Punkte kostet und bei einem Feuermagier nützlich ist und natürlich The Kiss Farewell. 
    Der Kiss macht aus unserem Magier ein Barrage 7 Deady Shot Kanonenboot mit Volley 3 was schon ganz nett ist. Wenn auch meist etwas teuer eine sehr witzige und Effektive Option um sich um mässig gerüstete Gegner zu kümmern. The Unwrought läßt Brutes bestandene Schutzwürfe wiederholen was den Schaden von Feuer erhöht. Wird man mir selbst nur gewählt, wenn ich sonst nichts mit den Punkten anzufangen weiß.

FazitZwei Jahre und weiterhin der schlechteste Charakter der Hundred Kingdoms was überwiegend an seiner unbrauchbaren Warband liegt. Die neuen Elemental Sprüche sind nett und helfen quasi nicht, zwei Lehren sind weiterhin super situativ und sobald man darüber nachdenkt ihn als Buffbot zu verwenden kann man die Punkte besser in entsprechende Regimenter stecken Sehr schade, da ich ihn Mal sehr gerne gespielt habe. Ich verstehe persönlich auch nicht warum er nicht einfach die gleiche Warband wie der Imperial Officer bekommt. Das würde ihn einfach um so vieles besser machen. Oder dass man statt den Elemental Sprüchen ihm erlaubt genau einen Zauber aus einer anderen Lehre mit zunehmen.